First bake: Not a Christmas cake (part 2)

Not a Christmas cake - with penguins
Well, I finally got round to decorating the Christmas cake I made in December – and it almost looks too good to eat!

I’ve had this recipe from Asda magazine for a Christmas decorated with rather crazed-looking penguins for a few years, but have never quite got round to making it. So, I’m very pleased to have finally attempted it with a moderate level of success.

Not a Christmas cake - with penguins
The cake had matured for around 2 months before I decorated it, and I diligently fed it brandy every week over that period. Thankfully, it turned out to be sturdy enough to hold the weight of the icing, despite all the booze!

I started off by covering the cake with marzipan, then a layer of sugarpaste. I deviated from the recipe here as it called for more sugarpaste to create an iceberg/ravine scene, but I felt it would make for ridiculously thick icing, so I kept it simple.

Not a Christmas cake - with penguins
Then my boyfriend and I started on the fun task of creating the penguins. This was fairly easily done with pre-coloured icing and a couple of cake decorating tools to help with cutting and placing tiny, tiny blobs of icing on other tiny blobs of icing.

We also made piles of snowballs to show that the penguins were in the middle of a snowball fight, and a snow penguin just for fun! My favourite bit is the ‘secret’ penguin on the cake board, who is definitely going to win the fight by popping up out of nowhere.

Not a Christmas cake - with penguins
I was surprised at how easy it was to decorate the cake overall – despite taking a cake decorating course a couple of years ago, I have zero confidence in my ability to make cakes that actually look nice! I would love to attempt this again with another scene like this – would a woodland scene be too adventurous…?

Not a Christmas cake slice
So, what does the cake actually taste like? It does indeed taste like an extremely drunken Christmas cake! I shared it out with friends last night, and the brandy was the first thing we all commented on – not that the booziness detracts from the loveliness of the cake in anyway! It is extremely delicious, especially with the marzipan, and all the different kinds of fruit make for a great flavour. I’ll probably give it another go for next Christmas, albeit actually in time for December 25th!

Adventures in cake decorating (part 4)

Handbag cake topper

Handbag cake topper

This is the final post in my cake decorating series (sob!) and covers the last two weeks of the course, both of which involved novelty cake toppers.

The penultimate class saw us attempt to make some handbag cake decorations using Mexican paste and some rather nifty templates. The premise is pretty simple – carefully cut out a handbag shape for folding up, stick the edges together with glue, and decorate. Unfortunately my Mexican paste turned out rubbish again (despite following my tutor’s advice to grind up the tylo powder first), and it cracked quite a lot. The bag I made in the class was a disaster and wouldn’t hold together, so I made another one when I got home (in the picture above) that was slightly better, but not much.

Some of the other women went all out and made lots of perfect bags complete with long straps and piped lettering, but I settled for a simple purple clutch instead, as I imagine that’s what would go on any birthday cake of mine! I would like to try this again with some Mexican paste that actually works, so I may resign myself to buying some so I can make a perfect bag too.

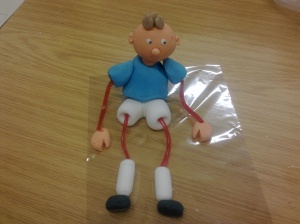
String footballer cake topper

String footballer cake topper

The final week saw us attempt to make a ‘string person’ using the dreaded Mexican paste and strawberry laces (we did have to sample some of the strawberry laces first in the name of research, of course). I loved making this model – perhaps because I used some paste my tutor had made! – and it was probably my second favourite part of the course after the Mexican paste lily.

As you can see, the feet, socks, shorts, top, hands and head were all made from Mexican paste, with holes carefully hollowed out in the relevant places for the insertion of the strawberry laces. The body was kept upright with the help of uncooked spaghetti thrust vertically down the neck – we could then snap off most of the protruding bit of spaghetti and stick the head on top. The eyes are little holes filled with royal icing.

This was really fun to make and I’d quite like to have a go at making other string figures – especially a cow!

So, that was the end of my adventures in cake decorating. It was an extremely positive experience overall. I think I surprised myself with some of the things I was able to do, although there was definitely room for improvement in a lot of areas. I’ll try to get some practice in at home when I get time, and maybe think about enrolling on another course in future to make sure my newly acquired skills aren’t forgotten!

I would definitely recommend looking up your nearest cake decorating course if you think you might like to give it a go. Mine took place at my local community centre and is run by one of the colleges in town, so maybe have a look at what your local college has to offer!

Adventures in cake decorating (part 3)

Mexican paste lily

A few weeks ago we tackled what was probably my favourite part of my cake decorating course (which finished this week) – creating a lily with a sort of 3D effect out of Mexican paste.

First, we made the round base for the flower to go on and crimped it around the edges. Then, we used a lily patchwork cutter (this one) to make a slight imprint on the base to show us where to place the petals and leaves.

Next, we rolled out some Mexican paste mixed half and half with sugarpaste. It had to be really thin to create a delicate flower effect. We used the patchwork cutter to cut out the entire image and stuck the different parts to the base, which was a little fiddly – especially the pollen! We then used some dusting colours to lightly colour the lily.

The final bit was cutting out some more of certain of the petals and leaves to create the 3D effect. These were stuck to the flower already on the base, but we only put glue along one or two of the edges of the petals/leaves and kept some rolled up tissue under the loose parts to make sure they dried in the right way (if we hadn’t propped them up with tissue, they would have just dried flat). Finally, we brushed on another coating of colour.

Mexican paste lily

Mexican paste lily close-up

I’m really pleased with my effort – it was by the far the best thing I did on the course! I really liked using the dusting colours and will definitely be looking to do something similar again soon.

Diamond jubilee cake

This week’s cake decorating class required us to bring in a cake to cover with sugarpaste and decorate with a diamond jubilee theme. I made the raspberry and almond madeira cake I baked for my birthday the other week – Victoria sponge would have been my first choice, but my tutor said it would probably be too soft to take the weight of the icing.

I had to trim the top of my cake because it was a bit bumpy. The surface needed to be as smooth as possible to ensure the sugarpaste can lie flat. I then spread the top and sides of the cake with buttercream to help the icing stick to it. Next came the tricky bit – rolling out the icing and covering the cake with it. I managed to roll it out to the right size, but had a bit of trouble smoothing it out once it was on the cake, so I ended up with a few uneven bits that you might be able to see in the picture above.

Then came the hardest part of all (for me, anyway) – piping the lettering on to the cake. We practiced this last week, but I quickly discovered that I’m not very good at it. As I went away for a few days towards the end of last week, I hadn’t had time to practice at home, so this ended up being my second ever attempt at piping lettering. It ended up okay; the ‘Diamond’ was a bit wobbly, but I’d got better by the time I started on the ‘Jubilee’. Still, it could have been a bit neater!

Next, I affixed a crown I made from coloured Mexican paste last week to the cake with royal icing, then made a long sugarpaste ‘sausage’ to go around the base of the cake and textured it with a crimper all the way round. Then I made the bunting, which took the form of a smaller sausage and red and blue triangles attached to the cake with a dab of water (I can’t remember whether the triangles were sugarpaste or Mexican paste, but considering how easy it was to cut into the cake the next day, I think they were sugarpaste).

The whole thing took two hours, plus baking and the time spent the previous week on making the crown. I was quite proud of my effort, although I think it could have gone better (and quicker – again, I was way behind everyone else!). I’d like to practice piping lettering and covering cakes with sugarpaste more, so hopefully I’ll have some time to do so soon.

The cake seemed to go down well at a jubilee lunch I organised at work the next day, although there was quite a lot left over because other people had brought lots of cake themselves! Still, that was no bad thing, as I could take it home and enjoy what was left myself!

Adventures in cake decorating (part 2)

I’m about a month into my cake decorating course now, and I don’t feel like I’m getting much better at it! I am, however, coming to appreciate just how difficult it is to create those wonderful feats of decoration that you see on lavish wedding and birthday cakes. What really drove this home was when we recently made a little figurine out of Mexican paste.

Mexican paste is basically a type of icing that dries really, really hard – ideal for fiddly models, but not so much for eating! Making the Mexican paste itself shouldn’t be that difficult, as long as you can source gum tragacanth (or a substitute, like tylo/CMC powder) and liquid glucose. I found my tylo powder on eBay and the liquid glucose in a large Morrisons.

When you come to mix it, you’ll find it stays quite dry and powdery for ages before it comes together to form something quite similar to sugarpaste. However, something went wrong with my mix and I had to add much more water than the recipe called for to get it to come together. It was still a bit too dry after it had matured for 24 hours, so I made another batch last week – and the same thing happened again! My tutor said it’s possible there’s a problem with my tylo powder, so just be aware of this when buying yours.

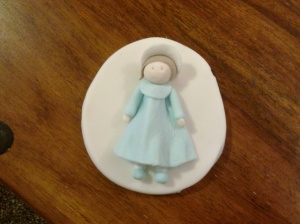
Anyway, I managed to do some work with the original batch of Mexican paste despite all that. We spent the entire two-hour lesson making a model of a girl, complete with a dress, hat and all limbs intact. I found it pretty difficult because we had to concentrate on making several very small parts, which had to be the right size and had to be affixed to the model in the right way. Unfortunately, I fell behind a little and had to accept help from the tutor to get it all done on time, which I hated but it had to be done.

Mexican paste model

Mexican paste model

You can see the results of my (or our) efforts above. We made the legs first, then the dress, head, hair, hat, hands and shoes. Mine doesn’t look as delicate or detailed as some of the other women’s models, but I’m still pretty happy with it! I’m not sure if I would do this again off my own bat, especially because I seem to be unable to get on with making Mexican paste, but I certainly appreciate the hours that expert cake decorators put into making bigger, more elaborate models!

Adventures in cake decorating (part 1)

I started a cake decorating course at my local community centre a few weeks ago. The reason I signed up is a simple one – while I absolutely love making cakes, they never look particularly pretty (evidence of this can be seen all around the blog!). I had absolutely zero experience of anything relating to decorating cakes before I started – adding water to icing doesn’t count! So I knew I would be pretty much bottom of the class from the start.

It’s quite a small class, with around 10 of us (all women) attending each week. Many of the others have been to the class in previous terms, but there are a couple of other women who, like me, have never done anything like this before.

The first class was pretty much an induction, but it was good to find out what we’ll be doing over the next couple of months. I’d never come across most of the concepts before, but I’m very excited about attempting to make an edible handbag and string people (I might try to make a string cow!).

Last week, we tried our hand at brush embroidery. I had never heard of the technique before and was a little worried about it – I envisaged two hours of attempting to ’embroider’ a sheet of rolled-out sugarpaste and failing miserably. However, it’s not quite what it sounds like. The technique involves piping royal icing in a pattern of your choosing (in our case, a flower) on to some sugarpaste and brushing the icing in such a way that it creates a pretty textured effect.

We used a flower-shaped cutter first to emboss the design on to the sugarpaste, and then made our own piping bags and filled them with some royal icing that the tutor had already made the previous week. We were encouraged to mix some bright colours into the icing. I attempted to mix red and blue to make purple, but didn’t mix in quite enough red and ended up with this blue instead. We then created the yellow middle using a bit of sugarpaste embossed with a repeating circular pattern, which was done using the end of a straw.

My attempt at brush embroidery

My attempt at brush embroidery

I’m quite pleased with my efforts – it at least looks neat and like a flower! It’s a far cry from some of the more professional results you can gawp at elsewhere, though – but hopefully with a bit more practice I can make my brush embroidery look more artistic.

We’re going to be playing with Mexican paste (something else that’s brand new to me) this week – hopefully I’ll do a tad better this time round!