Re-bake: porter cake

Porter cake

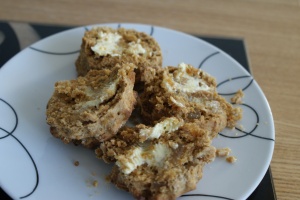
Blurry porter cake

Cake and booze: a brilliant combination, wouldn’t you agree? I’m on a baking rota at work where a group of us take turns each week to bake some wonderful goodies to bring in and sell so we can raise money for charity. I like to run an office-wide poll to decide what to bake, and this week porter cake won out (well, it was tied with Victoria sponge, but I decided to make something I hadn’t brought into work before).

I’ve made this once before (the recipe is from BBC Good Food 101 Cakes & Bakes) and really like it; I particularly love how the dried fruit is cooked in a mixture of porter, butter, sugar and orange juice and zest. You can taste the porter in the fruit, but it’s not as overpowering as those brandy-soaked fruit cakes you tend to pig out on at Christmas.

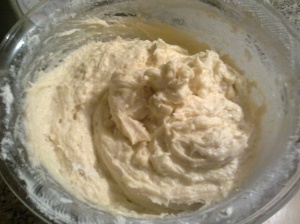
Porter cake mix

Porter cake mix after adding the bicarb

The cake isn’t particularly difficult to make, but it does take a little longer than your average cake due to having to simmer the raisins in the liquid, butter and sugar, let it cool, etc. It’s also baked for up to 1.5 hours at a very low heat (I actually needed to leave it in for a bit longer), and for best results you need to leave it in the tin for a couple of days to become even more delicious.

I made this last night and sliced it up earlier this evening, so it has had about a day in the tin. To be honest, it doesn’t seem to be any different to when I made it last time and left it for two and a half days, so if you’re in a rush I would say don’t worry about leaving it for ages before serving.

I’m not sure how well it’s going to go down at work; most of my colleagues tend to favour chocolate-based baked goods, so we shall see how many pieces I can sell! Of course, it’s not the end of the world if they don’t all sell, as it means I can take on the task of polishing off the rest of the cake over the weekend!

P.S. I took the below picture in my bedroom because nearly all the photos I took in the kitchen after slicing the cake up turned out ridiculously blurry. Apologies for inflicting my garish duvet cover on you!

Porter cake


First bake: ginger and treacle scones

Ginger and treacle scones

I’ve been meaning to bake something all weekend. I’d settled on an old favourite, chocolate orange and pecan cookies, until I caught up with the brilliant Cakes, Crumbs and Cooking blog this morning. I started following this blog not long ago and it seems everything Caroline makes is right up my street. So when I saw her recipe for crystallised stem ginger and treacle scones – featuring two flavours I absolutely adore in cakes – I just *knew* I had to bake them.

I’ve made scones a few times before, but they’ve always been the plain variety, with mixed results. These scones actually seem to be easier to make than the ones I’ve baked before. I liked Caroline’s trick of mixing the treacle with milk and then warming it in the microwave to ensure the treacle can be evenly mixed into the dough – it definitely worked a treat. The only faffy bit for me was rubbing the butter into the flour mixture to create ‘breadcrumbs’, but this is something I always find a bit faffy to do!

Unbaked ginger and treacle scones

Ginger and treacle scones, pre-baking

I used a slightly smaller cutter than the one Caroline used – it was probably about half a centimetre smaller. I managed to get 9 scones out of the mixture using this cutter, and they stayed pretty much the same size after going in the oven (although some of them did puff up on the top rather spectacularly – you can see some in the picture below). This is probably because the dough wasn’t completely brought together on the top for some of them, as you can see above in the ‘before’ picture.

Ginger and treacle scones

Baked ginger and treacle scones

Taste-wise, the scones are pretty damn good. The stem ginger provides the prevailing ginger flavour, while you get a hint of treacle in the background. I had a couple a few minutes after they came out of the oven, with butter, but I think Caroline’s suggestion of having them with ginger conserve would work beautifully. They came out a little crumbly but not overly so; next time I will probably work the dough a bit more to bring it together and avoid the messy tops, as well as maybe add a little more treacle to coax out that particular flavour a tad more.

Ginger and treacle scones

The recipe

You can find the recipe on the Cakes, Crumbs and Cooking blog here: http://cakecrumbsandcooking.blogspot.co.uk/2012/03/crystallised-stem-ginger-and-treacle.html

Thanks Caroline!

Re-bake: madeira cake

Madeira cake

Madeira cake is my all-time favourite cake. If I could only eat one cake for the rest of my life, this would be it. This might surprise those of you who know of my passion for chocolate, but I’m firmly of the belief that the classics are classics for a reason – and you don’t get much more classic than a madeira cake!

I baked this last night as a Mother’s Day treat for my mum. Conveniently, this is also her favourite cake, so I get the pleasure of baking it several times a year for Mother’s Day and her birthday (and for my own birthday, too!). I’ve only ever tried one recipe for madeira cake (from Baking by Martha Day), and it’s always worked brilliantly – and yesterday was no exception.

It’s really quick and easy to prepare – the recipe calls for an electric mixer, but I’ve always made the batter manually with no problems. What elevates this recipe above other recipes that I’ve seen is the combination of vanilla extract and lemon zest, which really turns the cake into something utterly delicious (I rarely see madeira cake recipes that call for lemon). The texture is perfect – the crumb is very fine, yet lovely and moist. The cake rises wonderfully during baking and you know it’s turned out perfectly when you get that straight ‘slash’ in the middle on the top.

Madeira cake batter

Madeira cake batter

I’ve been using this recipe for a few years now and it’s never failed (apart from when I made it for my birthday last year after downing a large celebratory vodka and coke – there was slight, er, browning, shall we say) – so if you’re looking for an easy madeira cake recipe that delivers brilliant results, this is the one!

On a side note, you might notice that the pics in this post are of a better quality than usual. My brother very handily acquired a Sony SLR camera this week, so I appropriated it to take photos of the finished cake (I used my phone as normal for the batter pic, as I didn’t want to get the mix all over the lovely new camera!). Hopefully you can get a good idea of the loveliness of the cake from the SLR images.

Madeira cake


First bake: olive muffins

Olive muffins

Olive muffins - fresh out of the oven

I’ve been meaning to bake these muffins for a while. I copied the recipe out of Madhur Jaffrey’s World Vegetarian Cookbook, which belongs to my boyfriend, and then baked everything under the sun except these! I had to have a painful tooth out yesterday and need to stick to fairly soft foods for the moment, so I thought I’d give these a go for my tea tonight.

I do like a nice savoury muffin – I’ve probably mentioned my passion for Dan Lepard’s courgette and mozzarella muffins before. These olive muffins really appealed to me because I absolutely adore olives, so how on earth could I go wrong with this recipe?

Quite easily, as it happens. I managed to somehow miss out the addition of the spring onions to the dough when I wrote down the recipe, so even though I’d carefully sauteed them and set them aside to cool, I completely forgot to add them to the dough along with the olives and mint (I blame the painkillers I’ve been downing every 4 hours since Thursday). I ended up having to take the muffins out of the oven after 10 minutes to hurriedly sprinkle the onions on top, hoping it wouldn’t make much of a difference either way.

Olive muffin

The inside of an olive muffin

Unfortunately, it did. The muffins do taste of olives and mint when you get some in a mouthful, but the spring onions really do bring it together – so it’s a shame they’re all perilously perched on top of the muffins rather than being embedded inside! Without the spring onions, the muffins are a little plain. The recipe calls for non-salty olives, but I think these would be so much better with salty olives like the kalamata variety (which happens to be my favourite), or some intense, juicy green olives.

The texture of the muffins is a little bit more bread-like than the courgette and mozzarella muffins, which is probably down to the lack of eggs, minimal amount of oil and addition of water to the dough – which also has to be briefly kneaded in a similar way to bread dough. I quite like this texture, though, as it makes the muffins seem more substantial.

I will definitely make these again soon, and will remember to add the spring onions *before* the muffins go in the oven. I have a feeling it really will elevate them to must-eat status! I might also try adding feta cheese and/or sundried tomatoes, as I reckon these flavours will work perfectly with the recipe.

Olive muffin


First bake: peanut butter brownies

Peanut butter brownies

I wasn’t intending to make two brownie recipes in a row, but I wanted to whip up something new fairly quickly yesterday to ensure we had sweet treats on hand for a lazy day of watching films. I spotted this in my recipe folder and (surprisingly for indecisive me) made an instant decision to bake some peanut brownies.

As with pretty much every single brownie recipe I’ve ever tried, these were really quick and easy to make. The joy of making brownies is that to get the required firm-crust-soft-inside consistency, it’s pretty much compulsory to just chuck everything in, stir only a little, and then empty the mix into the tin and bake for just 30-40 minutes, depending on the recipe.

This particular recipe includes a very small amount of faffing in that you need to melt some of the ingredients first and then melt a little of the peanut butter and chocolate separately to decorate the brownies at different stages of the baking process. But even all of that is incredibly straightforward if you can melt the decorative peanut butter and chocolate in the microwave instead of on the hob.

Pre-oven peanut butter brownies in the tin

Pre-oven peanut butter brownies in the tin, with melted peanut butter on top

The only sticking point was that with the recipe requiring the eggs to be mixed in straight after melting the ingredients, I had to get my boyfriend to do the mixing very quickly for me while I cracked the eggs in to make sure we didn’t end up with a disgusting scrambled egg concoction in the warm mix. That turned out fine as well, so if you do try this recipe I would recommend remembering to either let the mixture cool a little before you add the eggs, or to make sure you’ve got your eggs and flour ready to be quickly stirred in so you can stick them straight into the hot pan without ending up with a brownie disaster.

I put these in a gas oven for a little longer than 35 minutes, as I was also baking some rolls for lunch (not from scratch!) and had to move the brownies to the bottom shelf for a bit. If they’d stayed on the top shelf they would have been fine to remove after 30 mins, I think.

So, how do they taste? Extremely good! I’m a huge fan of the peanut-chocolate combination and the balance of salty nuttiness, dense chocolate and sweet brown sugar is spot on for me. The crust is pretty solid and the inside is perfect – not too gooey but not too dry. I used a 50/50 mixture of standard dark chocolate (Co-op Fairtrade with 48% minimum cocoa solids) and something more intense (Co-op Truly Irresistible, 85% cocoa solids). I decorated with the former to save the big cocoa hit for the cake itself, and I think this worked well.

Peanut butter brownies

The recipe

Happily for my lazy fingers there’s no need to copy this out of a book; the recipe is on the BBC Good Food website here: http://www.bbcgoodfood.com/recipes/1272634/peanut-butter-brownies