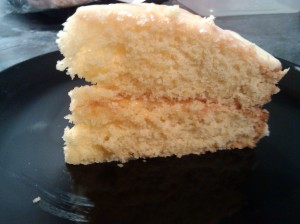
Coconut cake with lemon cream cheese filling

Coconut cake with lemon cream cheese fillingHere’s a cake I made a few weeks ago in honour of my sister-in-law, who told me a while back that she really likes lemony, coconutty cakes: a coconut cake with a lemon cream cheese filling.

I’ve made a three-layer version of this before, but I wanted something less faffy (and less likely to topple over), so I combined the filling from that recipe with my usual coconut cake sponge recipe to bring it down to two layers.

Coconut cake with lemon cream cheese filling
The filling is really quite something – I bought the lemon curd, but if you’re happy to make it from scratch, then I suspect it’d be even better! The sharpness of the lemon against the unnnngggh-ness (yes, that’s a word) of the full-fat soft cheese is truly delicious!

I only used the zest of one lemon in the sponges and couldn’t really taste it, so I’ve recommended two lemons in my recipe below.

I assembled this on a really hot day and it started to droop a bit after a few hours, so make sure you eat it up very quickly if you also make it for a special summer occasion… which I’m pretty sure won’t be a problem!

Coconut cake with lemon cream cheese filling

Coconut cake with lemon cream cheese filling recipe

Serves 10

For the sponge layers:

  • 175g softened butter
  • 175g caster sugar
  • 175g self raising flour
  • 1.5 tsp baking powder
  • 3 eggs, beaten
  • 75g dessicated coconut
  • 2 tbsp coconut cream (I used Patak’s coconut cream, which comes in sachets)
  • finely grated zest of two lemons

For the filling:

  • 75g unsalted butter
  • 75g icing sugar
  • 200g soft cheese
  • one-quarter tsp vanilla extract
  • 2 tsp lemon juice
  • 100g good quality lemon curd

Method:

  1. Preheat the oven to 180C/gas mark 4. Butter and line the base of two 20 cm/8 inch sandwich tins with greaseproof paper.
  2. Mix the butter, sugar, flour, baking powder and eggs for 2-3 minutes until smooth. Gently stir in the dessicated coconut, coconut cream and lemon zest.
  3. Divide the mixture between the two tins and smooth the tops. Bake for 20-25 minutes until evenly golden and firm.
  4. Loosen the edges and leave the tins to cool for 5 minutes and then transfer on to a wire rack to cool. Peel off the lining paper.
  5. For the filling, beat together the butter and icing sugar, then beat in the soft cheese, vanilla and lemon juice.
  6. Sandwich the cakes with the lemon curd and cream cheese filling. Sift a little icing sugar on top and serve.


Save

Coconut and cardamom cake with mango cream cheese filling

Coconut and cardamom cake with mango cream cheese icing I’ve been thinking about making this coconut and cardamom cake with mango cream cheese icing for a while. It’s basically my trusty mango and coconut cake with some cardamom added to the cake mix, but that one extra ingredient really does transform the cake into something else entirely! It’s Indian mango season at the moment, which meant that I could use the most delicious mango in this recipe.

Coconut and cardamom cake with mango cream cheese icing
Funnily enough, just when I decided to make it, I also ended up acquiring the new recipe book from GBBO’s Chetna Makan, who, as is well documented on this blog, is one of my favourite GBBO contestants EVER. There’s a mango, coconut and cardamom cake early on in The Cardamom Trail, which must mean that we’re kindred spirits, right?! However, Chetna’s cake is much more impressive-looking than mine, although I suspect that they taste very similar!

Coconut and cardamom cake with mango cream cheese icing
Anyway, back to my cake. It was all very straightforward to make. I did end up with runny cream cheese icing again, but that meant I had an excellent excuse to use only as much as would fill the cake without it running over the sides and, er, safely disposing of the rest. In my stomach. I think I might try making the icing with mascarpone next time to see if it comes out any thicker!

Coconut and cardamom cake with mango cream cheese icing

Coconut and cardamom cake with mango cream cheese filling recipe

Serves 10

For the sponge layers:

  • 175g/6oz softened butter
  • 175g/6oz caster sugar
  • 175g/6oz self raising flour
  • 1.5 tsp baking powder
  • 3 eggs, beaten
  • 75g/2oz dessicated coconut
  • 2 tbsp coconut cream (I used Patak’s coconut cream, which comes in sachets)
  • 0.5 tsp ground cardamom (equivalent to the seeds of about 6-7 green cardamom pods)

For the filling:

  • 100g soft cheese (or try mascarpone!)
  • 2 tsp lemon juice
  • 50g icing sugar, plus extra for dusting
  • 0.5 medium, ripe mango
  1. Preheat the oven to 180C/gas mark 4. Butter and line the base of two 20 cm/8 inch sandwich tins with greaseproof paper.
  2. Mix the butter, sugar, flour, baking powder and eggs for 2-3 minutes until smooth. Gently stir in the dessicated coconut, coconut cream and cardamom.
  3. Divide the mixture between the two tins and smooth the tops. Bake for 20-25 minutes until evenly golden and firm.
  4. Loosen the edges and leave the tins to cool for 5 minutes and then transfer on to a wire rack to cool. Peel off the lining paper.
  5. Peel the mango, slice it away from the stone and chop into smaller chunks. Mash it to a pulp (you can use a food processor for a fine texture or a potato masher/fork for a chunkier one).
  6. Beat together the other filling ingredients and then stir in the mango.
  7. Spread one of the sponge layers with the filling and place the other on top. Dust with icing sugar and serve.

Frosted walnut layer cake + peanut butter cookies + Oreo brownies

Frosted walnut layer cakeNo, I didn’t go on the baking bender to end all benders in one night. I made these three recipes – frosted walnut layer cake, peanut butter cookies and Oreo brownies – over the course of the last few weeks, but haven’t had a lot of time to blog about them what with planning a wedding, organising my hen do, training for a 10K and, of course, just normal everyday life!

I thought it would help to blog about all three recipes at the same time, rather than labouring over three separate posts. And, hey, you get to drool over even more baked goods than usual!

Mary Berry’s frosted layer cake

I made this cake (pictured above) for my fiancé, who has been begging me to bake it ever since it turned up in a technical challenge on last year’s Great British Bake Off. It was fairly challenging, so I can only imagine how difficult it is without a full recipe to follow!
Frosted walnut layer cake 2
This is basically three layers of walnut sponge sandwiched with a big pile of buttercream and smothered with an even bigger pile of icing. There’s so much sugar in this recipe – be warned if your teeth tingle at the merest hint of sweetness!

The icing was quite tricky, and didn’t seem to completely set (I can’t remember from the show whether it’s supposed to, though), but I was pleased with my caramelised walnuts. I think my favourite bit of the cake was the buttercream, to be honest!

You can find the recipe on BBC Food here.

Peanut butter cookies

Peanut butter cookies
I made these when I found myself without any baked goods in the house, which really isn’t a great situation to be in. The recipe is from Dan Lepard’s Short and Sweet. I followed it to the letter, using spelt flour rather than the other option of wholemeal, but added a chopped up Twirl (milk chocolate fingers for the international readers out there!) at the last minute, just for the hell of it.

The cookies were gorgeously peanutty, but also ridiculously sweet! I don’t know if that’s down to the brand of peanut butter I used (think it was the ultra cheap stuff from Asda), the addition of the chocolate, or because Dan really does call for too much sugar, but just be warned! I’d tone it down next time by reducing the overall amount of sugar from 325g to about 200g.

Peanut butter cookies
The texture was rather interesting – they weren’t soft like a traditional cookie, but had more of a biscuit-like crunch, and also had distinct layers, which I assume is down to the bicarb. You can find the recipe on the Guardian website here.

Oreo brownies

Oreo brownies
Finally, I made these Oreo brownies after almost a year of a colleague asking (begging!) me to make them. I made them a few days ago for his birthday, and I think I met expectations!

The recipe is just my usual brownie recipe, with a packet of roughly chopped Oreos thrown in:

Makes 16 brownies

  • 320g dark chocolate
  • 250g unsalted butter
  • 3 large eggs
  • 125g dark brown sugar
  • 125g caster sugar
  • 85g plain flour
  • 1 tsp baking powder
  • 154g packet of Oreos, roughly chopped

Method:

  1. Preheat the oven to gas mark 3/160C/140C fan. Grease and line a 20cm square tin.
  2. Melt the chocolate and butter together in a pan or in a bowl set above a pan of simmering water. Set aside and leave to cool slightly.
  3. Whisk the eggs until pale then add the sugars and whisk again thoroughly.
  4. Fold the chocolate mixture into the egg mixture.
  5. Sift the flour and baking powder into a bowl and stir the Oreos in to coat.
  6. Add the flour and Oreo mixture to the wet ingredients and stir until just combined.
  7. Pour the mix into the tin and bake for about 1 hour, checking the brownies after 40 mins in case your oven is better than mine!
  8. Once the brownies look set on top, remove them from the oven and leave them in the tin to cool for at least 1 hour before slicing them up.

Chocolate tiramisu cake

Chocolate tiramisu cakeMy fiancé finally returned from more than 2 months away at work last weekend, so I decided to make a celebration cake to, er, celebrate. And what could be more celebratory than a massive pile of chocolate sponge, mascarpone, double cream and sugar, AKA chocolate tiramisu cake?!

I found this recipe on the Delicious magazine website, and followed it to the letter as much as I could. It was slightly faffy, but not as much as you might expect for what is essentially a four-layer gateau – bake two chocolate almond sponges, make an espresso and amaretto syrup, whip up a load of dairy products into icing and squish the whole lot together. That’s it!

Chocolate tiramisu cake
I cannot stress just how decadent the icing is. It called for 500g of mascarpone (!), 225ml of double cream, amaretto and icing sugar – and that’s in addition to the butter and buttermilk that went into the sponge! Basically, if you’re allergic to ANYTHING or would like to avoid diabetes/a heart attack, this cake isn’t for you.

Chocolate tiramisu cake
But my, is it delicious! The syrup is perhaps the star here – it soaks into every layer of the cake and adds a nice contrast to the super-rich icing. You really can’t eat much more than a thin sliver of this cake at a time, but that means you savour the flavours all the more.

Chocolate tiramisu cake
If you know someone who’s a fan of tiramisu, you really can’t go wrong with this cake as a wonderful surprise!

Blackberry Victoria sponge

Blackberry Victoria sponge
When my fiancé turned up with a jar of homemade blackberry and apple jam, I just knew I was going to incorporate it into a cake somehow. And even though it didn’t feel like that long since I last made a Victoria sponge, I really wanted to make another one with blackberry jam instead of my usual strawberry – so here’s my blackberry Victoria sponge.

It’s just my normal Victoria sponge recipe with a different jam, so it feels like a bit of a cheat to blog about it, but it was so delicious! The jam was perhaps a little more subtle than the strawberry variety, but that might also have something to do with me being a little overenthusiastic with the buttercream…

Blackberry Victoria sponge
It’s well and truly blackberry season, so this would be a great cake to make if you have lots of blackberry jam on your hands. If you’re not in the habit of making your own jam, you could try making a thick blackberry compote to use instead, or even just slice up some fresh berries and toss them in a bit of sugar instead.


Passion fruit layer cake

Passion fruit layer cake
I’ve never done anything with passion fruit before, apart from enjoy its juice in a fancy cocktail made by someone else. But I was very taken with this passion fruit layer cake recipe when I came across it on Pinterest, so I made a spur of the moment decision to make it.

Passion fruits are odd things. They’re filled with seeds that you can eat, but the best bit is the orange flesh that produces the aforementioned juice, which is capable of transporting you to a tropical island lapped by turquoise waters with a single sip… mentally, that is.

Passion fruit layer cake
The passion fruits I got were a bit under-ripe, so there wasn’t that much flesh to enjoy. Luckily, they produced just enough juice for this recipe.

The juice goes into the buttercream, which combines with the butter and icing sugar to create a real taste sensation. I couldn’t stop licking the bowl I made the icing in! Some of the juice is also brushed on to the sponges themselves, which is a nice touch.

The sponges came out wonderfully; they were just the right texture for a cake like this. Dense but not heavy, buttery but not too rich – absolutely perfect.

Passion fruit layer cake
Three of us managed to devour two-thirds of this cake within a day, which says everything you need to know about how good this cake is. I managed to somehow part with the rest to give it to my boyfriend’s sister, whose favourite fruit is passion fruit (and who is also a superb baker), and she gave it the thumbs up too.

Passion fruit layer cake
All in all, this is one of those cakes you simply have to make, especially if you’re planning a lovely afternoon tea for when the weather gets a bit nicer and you can sit outside with tea, scones and a centrepiece cake. Do it!

The recipe

Can be found on the Olive magazine website here: http://www.olivemagazine.com/recipes/passion-fruit-layer-cake/4109.html

Ultimate Victoria sponge AKA why the WI is wrong

Victoria sponge with fresh strawberries

I’m the kind of person who easily gets a bee in her bonnet about seemingly small things. People walking slightly too slowly in front of me, misplaced apostrophes, sales assistants who place my change directly on top of the receipt before handing it to me instead of giving me the change and receipt separately… they all annoy me. However, I’m sure we can all agree that cake is NOT a small thing. Especially the matter of how to make a Victoria sponge ‘properly’.

I’ve always made it in what I firmly believe to be the only way you should – two airy sponges sandwiched with something creamy and something fruity (ideally buttercream and strawberry jam respectively, but anything else that’s creamy and fruity is fine). So I was aghast when I learned that the Women’s Institute, that veritable paragon of ‘proper’ baking, tells impressionable bakers who may not know any better to forgo the ‘something creamy’.

I hasten to add that they do this as standard in their recipe, but then add a note saying to use cream on a “special luxurious occasion”. My response to this is…. NO. A Victoria sponge without a lovely layer of creaminess isn’t worth having, special occasion or not. What on earth is meant to offset the airy sponge and sweet fruit if not something creamy? Where’s the FUN?

Victoria sponge with fresh strawberries

Butter. Cream.

I’m not the only one who feels this way – I was heartened to read that Felicity Cloake of the Guardian also agrees with me (and in fact she pretty much sticks her tongue out at the WI by adding double cream to her buttercream), as does Great British Bake Off series 2 winner Edd Kimber. Unfortunately, the unofficial patron saint of British bakers Mary Berry confuses things by posting a cream-free recipe on her website along with a photo of a cake bursting quite rudely with cream.

If anyone has an argument for doing it the WI way, other than the frankly rubbish argument that you consume fewer calories, I’m all ears. But I’ll still do it the right way.

Victoria sponge with fresh strawberries

JUST LOOK AT THE CREAMY JOY

Now that I have my rant out of the way, here’s a Victoria sponge I made recently. I gave it a little twist by adding sliced fresh strawberries to the filling of buttercream and not as much strawberry jam as usual, and it was bloody lovely, even if I do say so myself. It’s just the perfect summer cake and one that’s quite timely if you’re planning to bake it in the next few days, as it just so happens to be National Afternoon Tea Week. That obviously doesn’t matter if you don’t need an excuse to take afternoon tea, like the Queen, who has it daily. And why the hell not?

The recipe

Adapted from this BBC Good Food recipe.

Makes 1 cake that can be cut into 8 or 10 pieces

  • 200g caster sugar
  • 200g butter, softened
  • 4 eggs, beaten
  • 200g self-raising flour
  • 1 tsp baking powder
  • 2 tbsp milk

For the buttercream filling (or use whipped double cream):

  • 100g butter, softened
  • 110g icing sugar, sifted
  • 1-2 drops vanilla extract

For the fruit:

  • handful of sliced strawberries (or any other summer berries)
  • 1 tbsp strawberry jam (or any other berry jam)

Method:

  1. Preheat the oven to gas 5/190C/fan 170C. Grease and line the bases of two 20cm round cake tins.
  2. Put all of the cake ingredients into a big bowl and beat until smooth. That’s it!
  3. Divide the mixture between the two tins and level the tops.
  4. Bake the cakes on the same shelf of the oven, if possible, for 20 minutes or until golden and springy to the touch. Cool the cakes on a wire rack.
  5. Make the buttercream (if using) by beating the icing sugar into the butter a bit at a time, before stirring in the vanilla extract.
  6. Spread half of the buttercream on one side of one of the cooled sponges and press the sliced strawberries into the buttercream.
  7. Spread one side of the other sponge with the jam and top with the remaining buttercream.
  8. Sandwich the two cakes together so that the filling is all in the middle. Sift icing sugar over the top to decorate.

Upside down apricot layer cake

Upside down apricot layer cake

I do like a good upside down cake. My favourite has long been the pineapple variety, but I acquired some fresh apricots and thought I’d give them a go to see what an upside down apricot cake would be like. I also like a nice layer cake, so I thought I might as well combine the two!

I adapted a BBC Good Food recipe for this – the original uses peaches and clotted cream, whereas I went for apricots and creme fraiche (as it was all I had in!). I sliced up the apricots as neatly as I could, tossed them in some sugar and lined one of the baking tins with them, scattering the rest of the sugar over the top.

The sponges themselves were a doddle to make thanks to the good ol’ all-in-one method, although I did have to leave them for a good 10 minutes longer in the oven than specified.

Upside down apricot layer cake

As you can see from the above picture, the top layer looked a lot nicer fresh out of the oven than it did the next day (top pic) due to the juices from the cooked fruit making the top slightly soggy. As such, making this on the day you want to eat it is a wise idea.

Upside down apricot layer cake

For the filling, I spread apricot jam on the top of the bottom sponge layer and mixed the creme fraiche with sugar and vanilla extract before slathering it on top of the jam. The creme fraiche was rather runny so I would use double cream or clotted cream as suggested in the original recipe next time. Despite that, it did taste nice!

Upside down apricot layer cake

I have to say, this was a rather delicious cake. The apricots were pretty tart (both the fresh and jam varieties) but this contrasted nicely with the sweet sponge and cream filling. The only downside is that the cake spoiled really quickly in the extreme heat we’ve been having recently – I really should have put it in the fridge or eaten the lot very quickly! Let that be a lesson to you all…

The recipe

Serves 8-10

For the sponges:

  • 200g butter, softened
  • 200g self-raising flour
  • 1 tsp baking powder
  • 200g golden caster sugar (I had to use a mixture of normal caster sugar and light brown sugar)
  • 4 eggs
  • 2 tbsp milk


For the topping:

  • 4 ripe apricots
  • 85g light brown sugar


For the filling:

  • 1-2 tbsp apricot jam
  • 100g creme fraiche or 230g double cream/clotted cream
  • 1-2 tbsp golden caster sugar (I used light brown sugar)
  • 0.5 tsp vanilla extract


Method:

  1. Pre-heat the oven to gas 4/180C/fan 160C. Grease and line two 20cm round cake tins.
  2. Sift the flour and baking powder together, then add the butter, sugar, eggs and milk. Beat with an electric whisk until smooth.
  3. Halve the apricots, slice each half into quarters and mix thoroughly with the 85g of sugar. Line one of the baking tins with the apricots and scatter any remaining sugar over the top.
  4. Divide the sponge mix between the two tins and smooth the tops. Bake for 20-25 mins until golden. The tin with the apricot layer may take a little longer to cook. Leave the sponges to cool on a wire rack.
  5. Beat the creme fraiche with the golden caster sugar and vanilla extract. Spread the cooled plain sponge layer with the jam and spread the creme fraiche mix over the top. Sandwich with the apricot sponge and serve. Be sure to eat it all up asap or store any leftovers in an airtight container – ideally in a fridge, if the weather’s warm!

My top 5 coconut baking recipes + 5 on the to-bake list

This post heralds the start of what I hope will be a series of occasional round-ups of some of my favourite baking recipes, each with a different theme. Today, I’m kicking things off with one of my most beloved ingredients: coconut!

1) Mango and coconut cake

Mango and coconut cake

This was my second attempt at a cake combining two of my favourite ingredients – and it was definitely a charm. This is the perfect summer cake and one that won’t last for very long!

2) Lemon coconut cake

Lemon coconut cake

This is one of the most popular recipes on this blog, and for good reason. As if the beautiful combination of coconut and lemon isn’t enough, the whole thing is finished off with a decadent cream cheese icing. The perfect Easter cake!

3) Coconut layer cake

Coconut layer cake

This is a wonderfully versatile cake that you can sandwich with whatever you fancy – you could go for pretty much any jam, some kind of chocolate buttercream, lemon curd, more coconut… you get the picture. This post is also a good example of my tendency to get over-excited and throw in more coconut than required by the recipe.

4) Orange macaroon cake

Orange macaroon cake

I initially wanted to make this cake to combine both mine and my boyfriend’s favourite flavours to celebrate his return from a long summer away with work last year (pass the sick bucket, eh?!). It’s incredibly more-ish and makes a lovely change from the more traditional pairings of coconut with various types of berry.

5) Bounty cake

Bounty cake

The daddy of ’em all, this is my most recent coconut-related success – and it’s bloody gorgeous. Not for the faint-hearted, there’s more coconut than you can shake a stick at, and you can tweak the flavours however you like. Just don’t skimp on the coconut.

And here are 5 more that I want to bake…

1. Coconut and lemon bakewell tart (John Whaite)

I’ve never baked a tart, but I’d really like to start with this one… yum!

2. Coconut quindim (BBC Good Food)

Never heard of a quindim? I hadn’t, until I came across this recipe. It’s a Brazilian dessert and looks bloody lovely.

3. Coconut and cardamom bread and butter pudding (Good Food Channel)

You start reading the name and you’re thinking: ‘oooh… exotic’. Then you get to ‘bread and butter pudding’ and you’re suddenly all ‘oh’. But I do like bread and butter pudding, and combining a quintessential British pud with lovely Indian flavours is a nice idea.

4. Fluffy coconut and lime cake (olive magazine)

I love coconut with lime. This looks so very tempting, and could be a nice special occasion cake.

5. Lemon, almond and coconut friands (Made From Scratch)

I’d really like to bake these for a sophisticated afternoon tea with a twist. You can’t go wrong with coconut and almond together!

Do you have any favourite coconut-related bakes?

First bake: coconut cake with chocolate buttercream (AKA Bounty cake)

Bounty cake

A while ago, I bookmarked a recipe for a decadent Bounty cake created by a Great British Bake Off contestant, with the intention of very definitely making it one day. Alas, the Bounty cake I made this week wasn’t from that recipe – in fact, I sort of invented it based on what I had in – but I suspect it tastes just as good!

I went about making the cake by baking two coconut sponges (adding more coconut than really required, obviously) and then whipping up a chocolate and coconut buttercream. I didn’t have much cocoa left, so I suspect it could have been more chocolaty, but no matter.

I sandwiched the two cooled sponges with the buttercream and then melted some white chocolate and poured it over the top. Why white chocolate? Well, why the hell not?! Actually, I just wanted it to look a bit more Easter-y, as it was for the office Easter bake sale.

Then came the best bit: chopping up four mini Bounty bars and throwing them on top of the cake before scattering it with liberal amounts of dessicated coconut. I put the finished cake in the fridge for about half an hour to allow the chocolate to set properly, but you don’t need to do this if you don’t mind messy fingers!

Bounty cake
The result was a very tempting-looking cake and lots of oohs and aahs in the office. I didn’t actually get to taste any until I got home (luckily, one piece hadn’t sold), but it was worth the wait, as it was ruddy delicious. I was especially pleased with the strong coconut flavour and the nice contrast with the chocolate buttercream and the white chocolate on top.

The only thing I would do differently next time is use unsalted butter instead of salted for the buttercream – either that, or use more icing sugar to balance it out. The saltiness was actually nice in conjunction with all the sugar, but I think it might be a bit weird for some!

All in all, this is an easy, delicious cake that’s a must for any Bounty fan!

Bounty cake
The recipe

Slices into 8-10 pieces

For the cake:

  • 175g self-raising flour
  • 175g butter, softened
  • 175g golden caster sugar
  • 1.5 tsp baking powder
  • 3 eggs, beaten
  • 75g dessicated coconut
  • 2 tbsp coconut, single or soured cream (I used soured)

For the buttercream:

  • 120g icing sugar, sifted
  • 100g unsalted butter, softened
  • 1 sachet of coconut cream (I used Patak’s)
  • 1 tbsp cocoa (use more for a more intense flavour)

For the topping:

  • 75g white chocolate, melted (or you can use milk or dark chocolate)
  • 2 x Bounty bars, roughly chopped (the ones with 2 mini bars in each)
  • 1 tbsp dessicated coconut
  1. Preheat the oven to Gas 4/180C/160C fan. Grease and line the bases of two 20cm round sandwich tins.
  2. For the cake, whisk the flour, butter, sugar, baking powder and eggs until smooth, ideally using an electric whisk.
  3. Stir in the cream and dessicated coconut.
  4. Divide the mixture between the two tins. Bake on the same shelf in the oven for 25 minutes. The cakes should be firm on top, golden brown and slightly coming away from the sides of the tins.
  5. Leave the cakes to cool in the tins for 5 minutes, then turn them out on to a wire rack to completely cool.
  6. For the buttercream, beat together the butter, icing sugar and coconut cream. Stir in the cocoa until well combined. Spread the buttercream on one of the cooled cakes and place the other cake on top.
  7. Pour the melted chocolate over the top of the cake (I poured it all in the middle and let it spread across the top of the cake and drip down the sides). Top with the chopped Bounty bars and sprinkle the dessicated coconut over everything.
  8. Place the cake in the fridge and leave for around 30 mins to allow the chocolate to set (or you can skip this step for a messier experience!).
  9. Slice the cake and enjoy!