Cinnamon buns

Cinnamon bunsI don’t make anything bun-like very often. I think I’m sometimes put off by the amount of time required to make some really decent buns. However, I gave cinnamon buns a go the other week, and was pleasantly surprised by how straightforward they were (well, sort of – read on…), and how delicious they turned out to be!

I used Felicity Cloake’s recipe for the perfect cinnamon buns, as published in the Guardian. I was amazed at how much cardamom it calls for – I know cardamom is quite common in Scandinavian baking, but I’ve only ever used a tiny amount of it because it has such a big, aromatic flavour. I had to re-read the ’25 pods’ bit until I was certain that’s what she actually meant!

Cinnamon buns
I did resist the urge to use fewer pods and went the whole hog. She doesn’t specify the type of pod to use, but I assumed she meant green cardamom as opposed to the black-podded variety.

Cinnamon buns
The other slight stumbling block was the consistency of the dough. I wish I’d read the comments on the recipe before I started, because a few people said they’d found the dough very wet and difficult to work with. Et voila – I didn’t so much tip the dough on to the work surface as pour it on!

Cinnamon buns
I used the long edge of a large spatula to sort of gather it up on the work surface and gave it my best attempt at a knead where possible. It didn’t seem to come together than much, but it was a little better after the first rise (but still very wet!). Spreading the filling on the wet dough and rolling it up was, er, interesting!

The other thing to note is that the recipe doesn’t mention what to do with the beaten egg and demerara sugar – I brushed the egg onto the tops of the buns and sprinkled the sugar over them before sticking them in the oven.

Cinnamon buns
The final product was rather delicious, and very, very large (yay!). The wet dough made for a really fluffy texture, and the cardamom flavour was very, very strong – to the point where it overpowered the cinnamon, but in a nice way, because I love cardamom! The filling was a bit on the salty side for my taste, so I would omit/reduce the salt called for in the filling next time.

Cinnamon buns
I would recommend this recipe for anyone wanting to give cinnamon buns a go, but definitely bear in mind my comments above before you do…!

Garlic and parsley soda bread

Garlic and parsley soda breadThis was a bit of a spontaneous bake. I really fancied some garlic bread to go with some pasta, but didn’t have any in, so I decided to knock up some garlic and parsley soda bread instead. It took a little under an hour to make from start to finish and was surprisingly delicious!

I think I’ve made soda bread once before, but have always found traditional bread more appealing. However, the bread episode of this year’s GBBO, where the contestants had to make flavoured quick breads, must have stuck in my brain and unconsciously persuaded me to make my own.

I used a Jack Monroe recipe for this, and followed it to the letter, but you could easily substitute/add to the flavours to suit your taste. I can image the bread being lovely with some parmesan or mature cheddar worked into the mix, or perhaps some sundried tomatoes and olives for a more Mediterranean flavour.

Garlic and parsley soda bread
The texture was very light, albeit pretty different to a standard bread – the crust wasn’t very crusty for a start. However, it really was tasty and went well with the pasta – I would definitely make this again in the event of another craving for quick garlic bread!

Spiced teacakes

Spiced teacakes
A few weeks ago I asked my fiancĂ© whether he had any baking-related requests, and he mentioned that he’d been enjoying toasted teacakes of late. After a quick search online I found a recipe for spiced teacakes that didn’t look too difficult to make, so I decided to have a go.

Spiced teacakes
At least, I thought they were easy until I realised I didn’t have quite enough strong white flour, so I had to substitute half of it for strong wholemeal flour and cross my fingers!

Spiced teacakes
They seemed to rise okay the first time, but didn’t rise very much at all the second time. I put them in the oven anyway and continued to cross my fingers…

Spiced teacakes
They were a tiny bit underdone in the middle, but otherwise, they tasted really nice thanks to the spices and orange zest. The teacakes were a tad heavy and became more so after a day or two, so if you make these and also use wholemeal flour, do bear this in mind!

I think I wouldn’t make these with wholemeal flour again, but I’ll definitely give them another go with the correct amount of strong white flour soon – they really were delicious warm with lashings of butter.

The recipe

Can be found on the BBC Food website here: http://www.bbc.co.uk/food/recipes/spiced_teacakes_29429

Hot cross buns

Hot cross buns
As mentioned several times before, I’m trying to practice my bread-making more, as I’m not particularly good at it. These Easter hot cross buns from a Paul Hollywood recipe presented a bit of a challenge for me, but I think I just about overcame it!

One of the intriguing things about this recipe is the addition of chunks of fresh apple, which help keep the hot cross buns moist and add a bit more flavour. There are also a lot of sultanas and mixed peel, along with a generous helping of cinnamon.

The main issue I had to grapple with was, as always, the proving of the dough. The recipe says it takes 4 hours in total to prove the dough (you need to do it three times), but the whole thing including baking took me well over 7 hours!

Hot cross buns
The problem was that the dough seemed ridiculously slow to rise. Things improved when I attempted to warm up the kitchen, covered the trays with greased clingfilm instead of placing them in plastic bags and placed the final shaped dough balls on a chair in front of a hot oven (the last two points are Lorraine Pascale tips!), but I suspect the sheer weight of all the fruit in the dough inhibited the rise somewhat. Either that or I should have kneaded the dough a lot more!

I also had issues with shaping the dough into nice, neat, round buns, which is an ongoing problem for me! Some of the buns ended up slightly deformed as a result, but I just ate those first…

Hot cross buns
I baked the buns in two batches. The first batch was nearly burnt on top, so I put the second batch in for a few minutes less than the first, which seemed to help.

Hot cross buns
Despite the near-burning and the proving issues, the buns tasted so good. The first one I had, fresh from the oven, was absolutely delicious and beautifully sticky from the apricot jam glaze. They were equally good toasted and buttered, too. I really can tell the difference between these and shop-bought hot cross buns!

Would I make these again? Well, perhaps in the height of summer and when I know I have a whole day free! If you have a warmer kitchen than mine, I would recommend this recipe. Paul Hollywood might be a harsh taskmaster, but his bread recipes really do tend to be a cut above the rest.

Hot cross buns
Paul Hollywood’s hot cross buns recipe

Can be found here: http://paulhollywood.com/recipes/easter-hot-cross-buns/

Chapattis, or how I finally defeated my nemesis

Chickpea curry and chapattis

Up until fairly recently, I had a love-hate relationship with chapattis (or chapatis). I absolutely LOVE eating them, especially when they’re freshly made by my mum, but I used to hate trying to make them myself.

For one, I could never get the dough right because my mum is rubbish at giving proper weights and measures for anything food-related (“Add one spoonful of oil.” “But how big is the spoon?” *shrug*). Secondly, I was TERRIBLE at making them come out completely round. You might think it’s a bit stereotypical, but the scenario with the daughter of Indian immigrants struggling to obtain her mum’s approval due to an ever so slightly wonky chapatti – or something resembling a map of India, in my case – is very much real, folks.

So, what changed? Well, it seems all I had to do was move out of my mum’s house, put together a recipe that made actual sense, and practice, practice, practice.

Chapatti dough

Chapatti dough

First, the dreaded dough. Neither I nor my mum think you can get away with just chapatti flour (or atta, as it’s also called) and water, although this is fairly traditional thinking. The secret to the perfect chapatti is almost certainly the little bit of fat that you add to the dough – a bit of sunflower oil and some sunflower spread rubbed in.

(My mum’s top tip for buying chapatti flour, by the way, is to look for anything with ‘Gold’ in the name, e.g. East End Gold Chapati Atta, to ensure a quality atta. Seriously. I LOVE MY MUM.)

The other key to getting the dough right is to not in any circumstances add too much water. Always, always go slowly when adding it, otherwise you’ll end up with a soggy dough and the vicious circle that is adding flour to counteract the sogginess, then adding water because it’s too dry again, etc etc.

Chickpea curry

Chickpea curry

Once you’ve given the dough a good knead, cover the bowl and leave it to rest while you prepare the curry to eat with your chapattis (assuming you’re going to make a quick vegetarian curry as I usually do, rather than spend hours on a luscious lamb curry). I made my favourite, chickpea curry, when I took these pictures and you can find the recipe for that below along with the chapatti recipe.

Then it’s time to roll out and cook the chapattis while the curry is simmering. The trick is to use plenty of flour in the rolling out process so that the chapatti turns by itself while you’re rolling it out, and to keep adding more flour as soon as it starts to stick. This is something my mum neglected to explain to me, hence my complete inability to turn out anything vaguely round when I was a teenager. It also helps to have a chapatti rolling pin that’s tapered at each end, although it’s not essential.

Chapatti tava

Chapatti tava

Now for the cooking. Again, it helps to have a special chapatti pan called a tava or tawa, but you can get away with a frying pan just fine. Luckily, my mum gave me loads of kitchen equipment when I bought my house, but you can buy Asian equipment at pretty much any large Indian grocer or cash and carry.

First, lay the rolled-out dough on the hot tava…

Chapattis

…then wait until it’s nicely puffed up…

Chapattis

…before flipping it over. The underside should have brown patches, like so:

Chapattis 4

Then all you do is leave to cook for a bit longer before transferring it to a plate:

Chapattis

And that’s it! Smear some butter on the warm chapatis and you’re good to go as soon as you’ve put the finishing touches to your curry.

It seems so simple now but believe me when I say the above pictures are the result of years of struggling to get it right. Luckily, now I’ve found out how to do it you can skip straight to the nice, round chapattis with your curry without the pain!

As it just so happens to be bread week on the Great British Bake Off, I’m submitting this to the Great Blogger Bake Off organised by Laura at I Love Crafty. I expect to be fully upstaged by both the other participating bloggers and the contestants’ amazing bakes on the show tonight!

The recipe – chapattis

Makes 4 (to serve 2 people) – easily doubled

  • 125g chapatti flour, plus extra for rolling out
  • 0.25 tsp salt
  • 1 tbsp sunflower oil
  • 60-70ml warm water
  • 1 tsp sunflower spread (I use Vitalite)
  • butter, to serve

Method:

  1. Stir the salt into the flour, then add the oil and 60ml of the water.
  2. Mix everything together until you get a fairly soft dough. Add more water if needed, but do this a few drops at a time.
  3. Rub the sunflower spread into the dough and knead for a couple of minutes until soft and smooth. Cover the bowl with a tea towel and leave to stand for 15-20 minutes, ideally while you make the curry.
  4. Put the tava or frying pan over a medium-high heat to get very hot.
  5. Split the dough into four equal pieces and roll each one into a ball. Gently flatten each one between your hands to create fat ‘discs’.
  6. Liberally sprinkle the surface with flour and roll the first disc out into a circle, always making sure there’s enough flour to keep it turning by itself under the rolling pin. Make sure the rolled-out dough is evenly thin – you’re looking for a thickness of around 2mm maximum.
  7. Cook the dough circle by placing it on the hot tava, making sure there are no bumps or wrinkles. Leave to cook for 1-2 minutes (roll out another chapatti while you’re at it!) until the top puffs up quite considerably and the underside has brown patches, then flip it over and cook for another minute.
  8. Transfer the chapatti to a plate, place the next dough circle on the tava to cook, and roll out another circle while it’s cooking. Repeat until all the chapattis are done. Spread a little butter over the top of each chapatti and serve with a piping hot curry.

The recipe – chickpea curry

Chickpea curry and chapattis

Serves 2 (easily doubled)

  • 1-2 tbsp sunflower oil
  • 0.5 tsp cumin seeds
  • 0.5 tsp black mustard seeds
  • 1 small white or red onion, chopped
  • 1 bird’s eye chilli, finely chopped (note: I like my curries very hot so you might be better off with half a chilli if you don’t!)
  • a 1-inch cube of ginger, finely grated
  • 1 garlic clove, crushed or finely chopped
  • 0.25 tsp red chilli powder
  • 0.5 tsp ground turmeric
  • half a tin of chopped or peeled plum tomatoes (if using the latter, squish them with your fingers to break them up a bit)
  • 0.5 tsp solid jaggery goor (unrefined cane sugar) or 1 tsp brown sugar
  • 400g tinned chickpeas (or red kidney beans or butter beans, or even parboiled chopped potatoes and some frozen peas)
  • a splash of lemon juice
  • 0.5 tsp garam masala
  • a handful of fresh coriander, chopped
  • salt, to taste

Method:

  1. Heat the oil in a saucepan and add the cumin seeds and mustard seeds.
  2. When the mustard seeds start to pop, add the chopped onion and fry gently for a couple of minutes, being careful to not let the seeds burn.
  3. Add the bird’s eye chilli, ginger, garlic, red chilli powder and turmeric and cook – still very gently – for a couple of minutes, stirring frequently to prevent sticking.
  4. Add the tomatoes and jaggery or brown sugar, and simmer for another couple of minutes before adding the chickpeas and covering the pan. Keep on a low simmer while you roll out and cook the chapattis (about 10-15 minutes), stirring occasionally.
  5. Add the lemon juice and garam masala, stir and then turn off the heat.
  6. Stir in the coriander, season with salt as you see fit, and serve with your nice, round chapattis.

Barm cakes

Barm cakes

Continuing my efforts to stick to my boyfriend’s new year’s resolution of having me bake more bread, I decided to try another Paul Hollywood recipe earlier in the week – barm cakes.

A northern staple, barm cakes are absolutely brilliant, especially for breakfast – I like them to form a crucial part of the good ol’ (veggie) sausage butty, while my boyfriend prefers them filled with a couple of fried eggs, cheese and hot pepper sauce.

Unfortunately, my baking experience with this particular bread was a little mixed. As you can see from the photo above, they’re not exactly perfectly round, and they’re not particularly risen, either. However, the good news is they looked, felt and tasted like barm cakes on the inside, so it’s not all bad!

Barm cakes

Hollywood’s recipe starts off in the same way as most of his white bread recipes, and it all seemed to go swimmingly until the bit where the recipe diverges from the others in order to get the bread the right shape. I think I rolled out the dough balls a bit too flat, and then didn’t leave them to rise for long enough (although they had more than the time specified, and in a warm kitchen on a warm day).

I put them in the oven anyway hoping that they would rise more, which they did, but not as much as expected. However, once they were cooled, split open, filled and eaten they proved (ha!) to be absolutely delicious, with none of the raw texture or flavour you would expect from a dough that hasn’t quite risen enough.

It’s all a bit of a mystery to an amateur bread baker like myself, but at least my boyfriend could justify having more than one for breakfast thanks to the small size!

The recipe

From How to Bake by Paul Hollywood. You can also find the recipe online here.


First bake: milk bloomer

Milk bloomer
Last month, my boyfriend announced that his new year’s resolution is for me to bake more bread. Yes, me. To support this resolution, he kindly got me a copy of Paul Hollywood’s How to Bake book, which is full of bread recipes. I sighed and got on with it.

The first recipe I decided to make was this milk bloomer, based on a recipe for milk loaf (which, funnily enough, I’d already ripped out of a magazine with the intention of baking it at some point in the distant future).

I have vague memories of milk roll from my childhood, although whether I actually ate any or simply gawped at the packet in Asda and wondered what Blackpool Tower had to do with bread is a question for another day. I was more drawn to what the addition of full-fat milk would do the texture of the bloomer, being a fan of a sturdy outer crust and a lovely soft crumb when it comes to bread.

I don’t have the most amazing track record with bread, bar some Spanish bread I made last year, so I was surprised when everything seemed to go to plan. The milk is added warm to the mix, and everything is kneaded for a good 5-10 minutes – I managed to knead for the full 10!

The rise was rather impressive – the dough doubled in size in the space of an hour on the first rise, then expanded massively on the baking tray after I’d knocked it back and left it to rise inside a plastic bag, as advised by Mr Hollywood.

By this point the dough was nothing like the shape I’d originally envisioned, but I pressed on, baking it for the full cooking time. It seemed fully baked when I took it out of the oven. I should have left it to completely cool, but I only managed to leave it for a few minutes before I started circling it like a vulture with a bread knife.

Unsurprisingly, it was very soft due to just coming out of the oven – but in a lovely, fluffy way, rather than in the dense, undercooked way that I’ve previously experienced with most breads I’ve tried to bake. The taste was wonderful – rich, nutty and full-flavoured, it was the perfect accompaniment to a wedge of mature cheddar and a slick of butter.

Milk bloomer

Sliced milk bloomer – apologies for the gloomy pic!

The two of us managed to polish off the entire bloomer in a little under 3 days, which I’d like to say is testament to the deliciousness of the bread rather than our greed. I will definitely make this again, and soon!

The recipe

Can be found in How to Bake by Paul Hollywood.

First bake: pan Gallego

Pan GallegoProper Bread isn’t high on my list of baking priorities (the last time I made bread that wasn’t pitta, naan or chapattis was in May), but I’ve had to start practicing again ahead of holding a Spanish-themed housewarming party next month, for which I will need to bake some Spanish bread. The bread in question is this rustic-looking thing, pan Gallego, which hails from the Galicia region.

Pan Gallego is supposed to contain a mixture of pumpkin seeds, sunflower seeds and millet, but I only had sunflower seeds so I just used those. It’s made using a mixture of strong white and wholemeal flour, along with a dash of olive oil. The recipe I used called for fresh yeast, but I only had dried and that worked perfectly.

Pan GallegoThis was a rather time-consuming bread to make in terms of kneading and proving, but it was well worth the effort. The bread rose nicely both during proving and baking, making for a huge beast of a bread! Although I was rather lax in allowing it to burn slightly on top, the interior is delicious and, to be honest, I hate wasting food so I’ve been eating the burnt bits anyway, and it’s still nice!

I’ve so far had this on its own, toasted with butter and honey, with manchego cheese and to mop up a half-invented vegetarian Spanish stew, and it’s been lovely on every occasion. There’s still lots left and I’m looking forward to trying it with other things!

The recipe

Can be found in Baking by Martha Day. A very similar recipe can be found online here.

First bake: wholemeal loaf

Wholemeal loaf

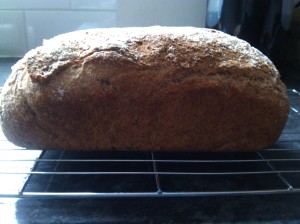
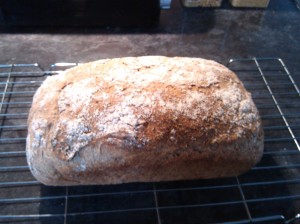
This, surprisingly, was my very first attempt at a Proper Loaf. I’ve baked pitta and naan bread before, but never just a good ol’ loaf of bread. I’ve always preferred brown to white bread so I thought I’d ease myself into the world of loaf making by following a Delia recipe for a wholemeal loaf.

Wholemeal loaf

The recipe itself was pretty easy to follow and everything seemed to go according to plan, which is somewhat shocking for me! I did everything it asked for, including warming the flour beforehand – which seemed slightly faffy, but probably made for a better result somehow!

Surprisingly, the recipe doesn’t call for lots of kneading – which I suppose is why it’s a quick and easy method.

Wholemeal loafI have to say, the smell of the loaf baking in the oven was AMAZING. It was so pleasing to have this smell in my house! I think it could maybe have done with a little more baking, though, as the texture was a little dense.

However, it still tasted great – we had some thick slices with big wedges of cheese for lunch and then toasted the rest the next day. It only lasted 2 days for 2 people, but we were both very hungry (of course!) on both days, so it might last longer for others.

I think I would definitely make this again, but knead the dough more/leave it in the oven for longer to see if that helps the texture.

Wholemeal loaf

The recipe

On the Delia Online website here: http://www.deliaonline.com/recipes/type-of-dish/bread/quick-and-easy-wholemeal-loaf.html

Recipes from around the web

Lots more baking recipes I want to try have recently come to my attention. I’ve only made the coconut and raspberry cheesecake from the last wishlist I posted, but I can’t resist adding even more recipes to my binder!

1) Spiced mango naan bread (Great British Bake Off)

I’m a huge fan of GBBO and, while I generally want to bake pretty much everything I see on this show, this particular recipe from the second episode of the current series is top of my list. Mangoes! Spices! Naan! What a great combination.

2) Almond spice cake (The Caked Crusader)

This blog never fails to please with its wonderful recipes. The Caked Crusader blogged about this particular cake in the same week I made my spiced honey cake – a sure sign we’re kindred baking spirits! Almonds are possibly my favourite nut to bake with, so this cake definitely has to be made.

3) Volcano cake (BBC Good Food)

What a wonderful idea for a celebratory cake! I love the lava spouting out of the top and the dinosaurs rambling around the volcano. I’m not sure when I’ll actually get a chance to make this, though – is there a National Volcano Day or something?!

4) Pistachio and pecan cheesecake with hot chocolate sauce (Come Dine With Me)

This is another food show I’m a massive fan of! This recipe is actually pretty old, but it’s been in my bookmarks for ages and I haven’t yet got round to making it – hopefully I will do soon. The sauce has to be a winner – melted Mars bars and amaretto? Genius!

5) Grasmere gingerbread (BBC Food)

I originally came across a recipe for Grasmere gingerbread in this month’s Asda magazine, and was immediately intrigued, as I love the Lake District and any recipe from somewhere that scenic – and that’s stood the test of time since the 19th century – has to be brilliant! I can’t find Asda’s recipe online, but this BBC Food version should give you some idea of the flavours.