We had our office Halloween bake sale yesterday, and I was still dithering over what to make up until last weekend, when I saw these rather lovely-looking spiced pumpkin brownie pies on Sunday Brunch.
I have to admit that I do roll my eyes a little whenever I see a recipe combining two or more things that should really be separate – anyone who’s on Pinterest will know what I mean when I say something like ‘salted caramel brownie cookie cake pie with muffin buttercream’. It’s just overkill and, as much as I like a calorific snack every now and then, those kinds of recipes really do sound like a heart attack waiting to happen.

However, I was rather taken with these pies, particularly the spiced shortcrust pastry and the pumpkin puree combined with maple syrup. The recipe was cooked on Sunday Brunch by a chocolatier, so his main focus was on the brownie topping and how to get that exactly right with the best chocolate. He also made a praline with pumpkin seeds to go with the pies, but I didn’t – which I’m rather glad about, because I found the pies time-consuming on their own!

Spiced pastry
I started off by making the pastry the night before doing the rest of the legwork. It’s a rather rich pastry with egg yolks, so it seemed a little too ‘wet’ before I put it in the fridge. However, it was perfectly alright when I took it out of the fridge the next day. The recipe on the Channel 4 website doesn’t tell you when to put the spices in, but I just added them with the flour. I didn’t have any mace so I used ground ginger instead.

Pumpkin puree
The next day, I *deep breath* hacked apart an entire pumpkin just to get 250g of flesh, roasted it, pureed it with maple syrup, reduced it in pan to get rid of the excess liquid, made the brownie mix, rolled out the pastry, cut out discs to go into a muffin tin, spooned the puree in the bottom of each pie then added the brownie mix on top. And then I baked the pies. *and exhale*

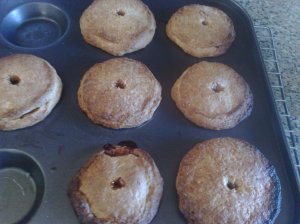
The pastry looks rather thick in the pictures here, but I actually ended up with enough pastry for 14 pies rather than just 12, so imagine how many pies I would have had if I’d rolled it out any thinner!

One thing I was surprised about was the lack of a raising agent in the brownie mix, but it was actually fine and I didn’t end up with any horribly hard brownie crusts. Phew. I used some posh chocolate with 85% cocoa solids from Asda.

Brownie mix
I thought there was a good amount of pumpkin puree in each pie, but after baking the weight of the brownie crusts flattened the pumpkin layer considerably. I think I would make more of the pumpkin puree next time, and less of the brownie mix (I had some left over even after filling 14 pies with it – but I didn’t let it go to waste!).

Can you see the pumpkin layer?
The baking time specified in the recipe seemed about right. I’m not particularly experienced with pies so I found it hard to tell when they were done, but I trusted that the slight browning around the edges was a good sign! I’m not sure whether they would have passed the ‘soggy bottom’ test, though!
The pies went down very well in the bake sale and I managed to sell all of the 12 pies I brought in. I’ve just tried one of the remaining ones for the first time and it was delicious, particularly the decadent brownie. I think the pumpkin could come through a little more, but the spices in the pastry are absolutely lovely.

I’d like to say I’ll make these again, but I have the rather pressing matter of what to do with all the leftover pumpkin I have in the fridge and I don’t think I can face going through all the different steps again any time soon… a simple loaf cake beckons!
The recipe
Adapted/corrected from this recipe on the Sunday Brunch website:
Makes 12 pies
For the spiced crust:
- 175g salted butter, softened
- 75g golden caster sugar
- 2 egg yolks
- 25ml water, at room temperature
- 250g plain flour
- ½ tsp freshly grated nutmeg
- ½ tsp ground cinnamon
- ½ tsp ground ginger
For the pumpkin puree:
- 250g fresh pumpkin, peeled and cut into 2.5cm cubes
- 25ml maple syrup
For the fudge brownie topping:
- 50g butter
- 40g golden syrup
- 125g golden caster sugar
- 140g dark chocolate, at least 70% cocoa chocolate
- 2 eggs
- 35g plain flour
Method:
- Preheat the oven to 170C/gas mark 3. For the puree, place the pumpkin on a baking tray, cover with foil and roast for 30 minutes until very soft.
- Meanwhile, cream the butter and sugar together until smooth, then add the yolks and beat well, then add the water mixing well.
- Mix the spices with the flour and add in 3 additions, taking care not to over mix.
- Wrap the dough in clingfilm and refrigerate for at least 1 hour (you can make the pastry in advance and chill overnight).
- Blend the soft pumpkin with the maple syrup, then tip into a saucepan and cook until it reduces, around 5 minutes.
- For the brownie topping, melt the butter, syrup and sugar in a saucepan until smooth. Take off the heat and add the chocolate, mixing well until very smooth. Add the eggs and beat well, followed by the flour.
- Once the pastry is chilled, roll out the pastry on a floured surface and cut into discs to line all 12 cavities in a greased muffin tin. Tip: cut small strips of greaseproof paper and place them across the middle of each cavity so that when you put the pastry disc in, the ends of the strip of paper are poking out of the top. This will make it easier to get the pies out after baking – you can simply pull the two ends of the paper to lift the pie out.
- Place a teaspoon of the puree into the bottom of each pastry case, then top with the brownie mix, covering the puree completely.
- Bake for 25 minutes (keeping the oven setting the same as when you roasted the pumpkin), or until golden-brown and set. Allow the pies to cool in the tins then turn out. When they’ve completely cooled, dust with a little icing sugar and serve.
 The recipe calls for coffee essence, which I’d never heard of and couldn’t find in the supermarket, so I made up a small quantity of very very strong coffee instead, and stirred that in.
 I had a strangely specific urge for exceedingly chocolatey flapjacks a couple of weeks ago, so I dug around the internet until I found this recipe.
 Confession: I made this so long ago that I have no idea where I got the recipe from – sorry! However, it was pretty straightforward and very similar to pretty much any other upside down cake. The cake itself contained ground almonds, which added a nice summery flavour to the proceedings.
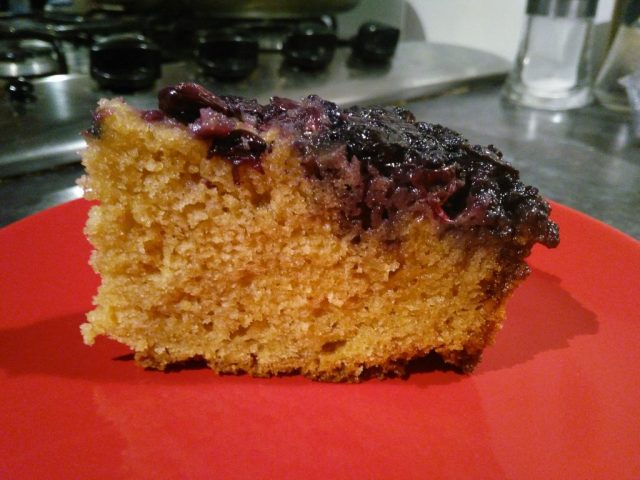 It was a delicious cake; I only wish I could remember the recipe so I can make it again…!
 It was a little labour-intensive and there was a panic when the pie started leaking in the oven, but it turned out really well and was warmly received by all! The recipe is a Jamie Oliver one and can be found here.