Recipes from around the web

Lots more baking recipes I want to try have recently come to my attention. I’ve only made the coconut and raspberry cheesecake from the last wishlist I posted, but I can’t resist adding even more recipes to my binder!

1) Spiced mango naan bread (Great British Bake Off)

I’m a huge fan of GBBO and, while I generally want to bake pretty much everything I see on this show, this particular recipe from the second episode of the current series is top of my list. Mangoes! Spices! Naan! What a great combination.

2) Almond spice cake (The Caked Crusader)

This blog never fails to please with its wonderful recipes. The Caked Crusader blogged about this particular cake in the same week I made my spiced honey cake – a sure sign we’re kindred baking spirits! Almonds are possibly my favourite nut to bake with, so this cake definitely has to be made.

3) Volcano cake (BBC Good Food)

What a wonderful idea for a celebratory cake! I love the lava spouting out of the top and the dinosaurs rambling around the volcano. I’m not sure when I’ll actually get a chance to make this, though – is there a National Volcano Day or something?!

4) Pistachio and pecan cheesecake with hot chocolate sauce (Come Dine With Me)

This is another food show I’m a massive fan of! This recipe is actually pretty old, but it’s been in my bookmarks for ages and I haven’t yet got round to making it – hopefully I will do soon. The sauce has to be a winner – melted Mars bars and amaretto? Genius!

5) Grasmere gingerbread (BBC Food)

I originally came across a recipe for Grasmere gingerbread in this month’s Asda magazine, and was immediately intrigued, as I love the Lake District and any recipe from somewhere that scenic – and that’s stood the test of time since the 19th century – has to be brilliant! I can’t find Asda’s recipe online, but this BBC Food version should give you some idea of the flavours.

Flying saucer birthday cake

Flying saucer birthday cake

As you might expect, I always bake a cake when my boyfriend’s birthday rolls round. This year, I wanted to put my newly acquired cake decorating skills (such as they are!) to the test and make something a little creative. After coming up with ideas including a Batman cake, Moomin cake, bee cake and snake cake, I settled on something a little more obscure – a cake based on a ship and aliens from a classic arcade game.

Unfortunately, my carefully laid plans went very wrong when I discovered that the extremely hot weather we had earlier in the week had resulted in my Mexican paste pretty much dissolving, so I couldn’t for the life of me cut out the shapes I needed to assemble the spaceship cake topper. After several attempts with various combinations of Mexican paste and sugarpaste, I abandoned the idea altogether and went for a simpler cake, still with a space theme.

So, let’s rewind a bit to the actual making of the cake itself. I wanted to make a Victoria sponge, but my usual port of call for this recipe wasn’t suitable because the cake needed to be heavy enough to take the weight of the sugarpaste icing I originally wanted to put on it. So instead, I made a round madeira cake. It was ridiculously easy to make (especially with an electric whisk handy!) and came out perfectly. I did, however, add some vanilla extract as I felt the recipe really needed it.

Round madeira cake

When it had cooled, I sliced off the domed part to create a flat top, then turned it upside down on to a cake board and sliced it into two layers. Next, I spread a layer of buttercream on the bottom cake and topped it with some strawberry jam before placing the other half of the cake on top. Then, I spread more buttercream all over the top and sides of the cake (I went on to add the sugarpaste layer and unsuccessfully cut out the shapes for the spaceship at this point, then took the sugarpaste off and added extra buttercream when I changed my mind).

Next, I sprinkled some edible silver balls and sugar stars all over the top and wedged five flying saucer sweets into the buttercream with the intention of making it look like the UFOs were flying through space. And that was pretty much it – much quicker than my original plan!

The cake went down extremely well with my boyfriend and the friends we shared it with while tackling the real ale rail trail from Manchester to Dewsbury and back. I thought it was delicious (even if I do say so myself!) and I’ll definitely make the madeira cake again. Whether I’ll attempt to apply my cake decorating skills again, though, is a different matter!

Photo courtesy of Mrs’icks via Flickr

The recipe

For the madeira cake:

  • 250g butter, softened
  • 250g caster sugar
  • 5 eggs
  • 185g plain flour, sifted
  • 60g self-raising flour, sifted
  • 1 tbsp milk
  • 0.5 tsp vanilla extract

For the filling and decorations:

  • 200g butter, softened
  • 280g icing sugar, sifted
  • 0.5 tsp vanilla extract
  • 170g good quality strawberry jam (I used half a jar of Hartley’s Best)
  • Edible silver balls
  • Sugar stars
  • Flying saucer sherbet sweets

1. Preheat the oven to Gas 2-3/160C/315F. Grease a 20cm round cake tin and line the base.

2. Beat the butter and sugar until well mixed, fluffy and light. Beat in the eggs one at a time.

3. Fold in both the flours and stir in the milk and vanilla extract.

4. Transfer the mix to the tin and smooth the top. Bake for 1 hr 25 mins or until a skewer inserted into the middle comes out clean.

5. Leave to cool for 5 mins in the tin, then turn out on to a wire rack and cool completely (if you don’t, the filling will melt!). You can refrigerate the cake for up to 2 weeks or freeze for 2 months at this point.

6. Make the buttercream by beating the butter until it’s creamy and smooth, then beating in the icing sugar a little at a time. Mix in the vanilla extract.

7. Slice off the domed top of the cake and turn it upside down on a cake board. Slice it horizontally through the middle to create two layers.

8. Spread about one-third of the buttercream on the bottom cake layer and dollop the jam on top (try not to spread the buttercream and jam near the edge of the cake – it’ll all move outwards when you put the other cake layer on top).

9. Place the other half of the cake on top and press down gently. If the cake looks lopsided at this point, add more buttercream in the middle where it’s sloping down to make it look level.

10. Spread the remaining buttercream all over the top and sides. It’s okay if it’s not completely smooth!

11. Sprinkle the top liberally with silver balls and sugar stars. Wedge a few of the flying saucer sweets sideways into the buttercream to make it look as if they’re flying through the stars. You can either put the cake in the fridge for a couple of hours to make the buttercream set, or leave it out for more gooey icing.

Adventures in cake decorating (part 4)

Handbag cake topper

Handbag cake topper

This is the final post in my cake decorating series (sob!) and covers the last two weeks of the course, both of which involved novelty cake toppers.

The penultimate class saw us attempt to make some handbag cake decorations using Mexican paste and some rather nifty templates. The premise is pretty simple – carefully cut out a handbag shape for folding up, stick the edges together with glue, and decorate. Unfortunately my Mexican paste turned out rubbish again (despite following my tutor’s advice to grind up the tylo powder first), and it cracked quite a lot. The bag I made in the class was a disaster and wouldn’t hold together, so I made another one when I got home (in the picture above) that was slightly better, but not much.

Some of the other women went all out and made lots of perfect bags complete with long straps and piped lettering, but I settled for a simple purple clutch instead, as I imagine that’s what would go on any birthday cake of mine! I would like to try this again with some Mexican paste that actually works, so I may resign myself to buying some so I can make a perfect bag too.

String footballer cake topper

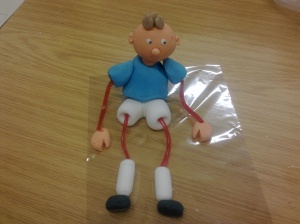
String footballer cake topper

The final week saw us attempt to make a ‘string person’ using the dreaded Mexican paste and strawberry laces (we did have to sample some of the strawberry laces first in the name of research, of course). I loved making this model – perhaps because I used some paste my tutor had made! – and it was probably my second favourite part of the course after the Mexican paste lily.

As you can see, the feet, socks, shorts, top, hands and head were all made from Mexican paste, with holes carefully hollowed out in the relevant places for the insertion of the strawberry laces. The body was kept upright with the help of uncooked spaghetti thrust vertically down the neck – we could then snap off most of the protruding bit of spaghetti and stick the head on top. The eyes are little holes filled with royal icing.

This was really fun to make and I’d quite like to have a go at making other string figures – especially a cow!

So, that was the end of my adventures in cake decorating. It was an extremely positive experience overall. I think I surprised myself with some of the things I was able to do, although there was definitely room for improvement in a lot of areas. I’ll try to get some practice in at home when I get time, and maybe think about enrolling on another course in future to make sure my newly acquired skills aren’t forgotten!

I would definitely recommend looking up your nearest cake decorating course if you think you might like to give it a go. Mine took place at my local community centre and is run by one of the colleges in town, so maybe have a look at what your local college has to offer!

Diamond jubilee cake

This week’s cake decorating class required us to bring in a cake to cover with sugarpaste and decorate with a diamond jubilee theme. I made the raspberry and almond madeira cake I baked for my birthday the other week – Victoria sponge would have been my first choice, but my tutor said it would probably be too soft to take the weight of the icing.

I had to trim the top of my cake because it was a bit bumpy. The surface needed to be as smooth as possible to ensure the sugarpaste can lie flat. I then spread the top and sides of the cake with buttercream to help the icing stick to it. Next came the tricky bit – rolling out the icing and covering the cake with it. I managed to roll it out to the right size, but had a bit of trouble smoothing it out once it was on the cake, so I ended up with a few uneven bits that you might be able to see in the picture above.

Then came the hardest part of all (for me, anyway) – piping the lettering on to the cake. We practiced this last week, but I quickly discovered that I’m not very good at it. As I went away for a few days towards the end of last week, I hadn’t had time to practice at home, so this ended up being my second ever attempt at piping lettering. It ended up okay; the ‘Diamond’ was a bit wobbly, but I’d got better by the time I started on the ‘Jubilee’. Still, it could have been a bit neater!

Next, I affixed a crown I made from coloured Mexican paste last week to the cake with royal icing, then made a long sugarpaste ‘sausage’ to go around the base of the cake and textured it with a crimper all the way round. Then I made the bunting, which took the form of a smaller sausage and red and blue triangles attached to the cake with a dab of water (I can’t remember whether the triangles were sugarpaste or Mexican paste, but considering how easy it was to cut into the cake the next day, I think they were sugarpaste).

The whole thing took two hours, plus baking and the time spent the previous week on making the crown. I was quite proud of my effort, although I think it could have gone better (and quicker – again, I was way behind everyone else!). I’d like to practice piping lettering and covering cakes with sugarpaste more, so hopefully I’ll have some time to do so soon.

The cake seemed to go down well at a jubilee lunch I organised at work the next day, although there was quite a lot left over because other people had brought lots of cake themselves! Still, that was no bad thing, as I could take it home and enjoy what was left myself!

A surprise cow cake

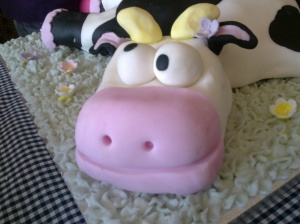
Cow cake!

I went to visit my boyfriend yesterday, as he was cooking a French feast for various members of his family who were staying over for the weekend. The meal itself was wonderful, but the cherry on top was this amazing cow cake that was presented to me at dessert time.

My boyfriend’s sister is a brilliant baker, and had apparently wanted to make this cake for me for a while. I have a bit of a thing for cows, and I’ve mentioned a few times recently that I’d like to make myself a cow cake for my birthday next month – but I’ve very definitely been beaten to it!

The head is made entirely of sugarpaste, while the grass was painstakingly piped on to the board. The body is a delicious blondie – or white chocolate brownie – cake, and the legs are little chocolate Swiss rolls. The best bit, though, is the colour of the blondie cake…

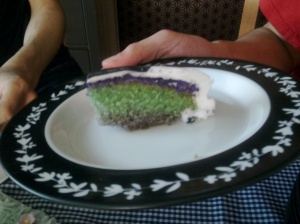
A piece of purple cow cake

Purple! (And green, but that wasn’t intentional.) There’s a layer of bright purple icing under the sugarpaste on the top of the cake, which helped ‘dye’ bits of the sponge purple, too. In case you hadn’t guessed, I also have a bit of a thing for purple (and yes, I ❤ Milka chocolate).

The cake tastes just as good as it looks – the blondie cake in particular is absolutely perfect. Also provided, but not pictured here, was a big pile of rocky road, which may or may not have been cowpats! Apparently.

Cow cake head

It was all such a lovely surprise, and it’s still making me smile today. The only problem is I have no idea what to make myself for my birthday now!