Hello! Just a note to say that I’ve started another blog with a more general focus on things that I like – i.e. not just food! Visit me at https://dipikawrites.wordpress.com/
Hello + goodbye
I can’t believe that it has been more than two months since I last posted!
Actually, I can. It’s been a while since I’ve felt the urge to bake and even longer since I’ve had the motivation to blog about something I’ve baked. While I’ve been busy and am trying my best to get vaguely healthy again and blah blah blah, I think it’s also time for me to admit that this blog has, unfortunately, run its course.
I didn’t really know where this blog was going to go when I started it in February 2012 – I’d started to bake quite regularly and wanted somewhere to deposit my recipes and have some sort of record of what worked and what didn’t. I’ve definitely succeeded in that respect; I refer back to my blog when I’m baking or cooking more than I thought I would five years later!
I’ve never wanted to make money, or even build a massive following for the blog (although it’s been so gratifying to see the visits grow month by month, with people from all over the world looking up recipes!). Now that I’m baking a lot less often than I used to – although I still cook a fair bit – and the world of food blogging has moved on considerably in the last five years, I think it’s time to hang up the, er, laptop.
I’m in the process of moving the site back to my old URL – theveryhungrybaker.wordpress.com – so none of my posts will disappear; they’ll just have a new URL. Who knows, I might even keep posting there every now and then if I come up some fantastic new recipes!
If you want to keep track of what I make anyway, whether it’s from a new recipe or something that’s already out there, please do follow me on Instagram where I’ll keep posting photos of things that I make. You can also keep an eye on the baking and cooking recipes that interest me by following me on Pinterest.
That’s about it. I do feel a bit sad about scaling back the blog, but it does feel like the right time. Thank you so much for reading and commenting on my posts and, most of all, making my recipes! It has meant a lot to me.
Baking round-up: coffee and walnut cake + chocolate flapjacks + upside down blueberry cake + snake pie!
I can’t believe it’s been over 5 weeks since I last posted! Did you miss me?! I haven’t been away or anything – just lazy about updating the blog, and I also seem to keep losing time to playing Zelda: Breath of the Wild (it’s seriously, seriously great).
I have, however, been baking…
Coffee and walnut traybake
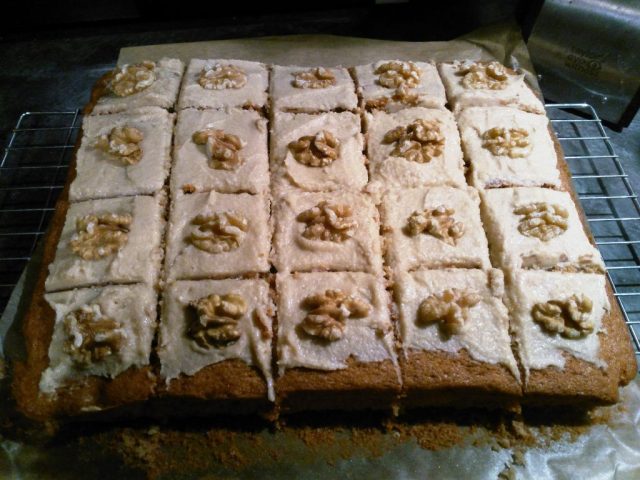
This is a Mary Berry recipe (of course) that is very similar to the coffee and walnut cake recipe used on Bake Off a while ago. The only difference is that this is a single layer traybake as opposed to a two-layer round cake.
 The recipe calls for coffee essence, which I’d never heard of and couldn’t find in the supermarket, so I made up a small quantity of very very strong coffee instead, and stirred that in.
The coffee flavour ended up being somewhat subtle, but it didn’t seem to matter because the sponge was just beautiful – exceedingly light and fluffy and very more-ish. It didn’t last long, I can tell you!
Double chocolate flapjacks
 I had a strangely specific urge for exceedingly chocolatey flapjacks a couple of weeks ago, so I dug around the internet until I found this recipe.
I tinkered with the recipe a little by pouring the melted chocolate on top of the flapjacks instead of dipping each one into it. I also (rather randomly) chopped up a couple of Penguin bars and threw them into the flapjack mix for extra crunch and chocolateyness.
The flapjacks ended up slightly overbaked, but they were still delicious! I can’t say I particularly noticed the Penguin bits in there, but I’m sure they didn’t hurt.
Upside down blueberry cake
 Confession: I made this so long ago that I have no idea where I got the recipe from – sorry! However, it was pretty straightforward and very similar to pretty much any other upside down cake. The cake itself contained ground almonds, which added a nice summery flavour to the proceedings.
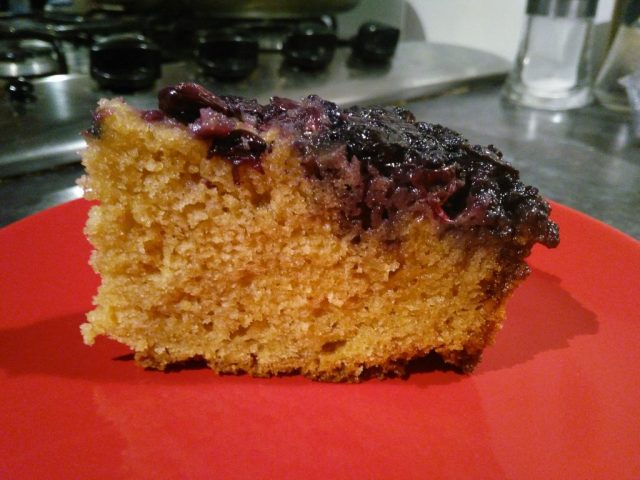 It was a delicious cake; I only wish I could remember the recipe so I can make it again…!
Moroccan snake pie
My husband and I (mainly my husband!) made this for a Moroccan-themed meal at his mum’s house recently. Also known as m’hanncha, snake pie is basically a lot of filo stuffed with a sugary, buttery, almondy mix that is then rolled up and coiled around to form a ‘snake’, before baking.
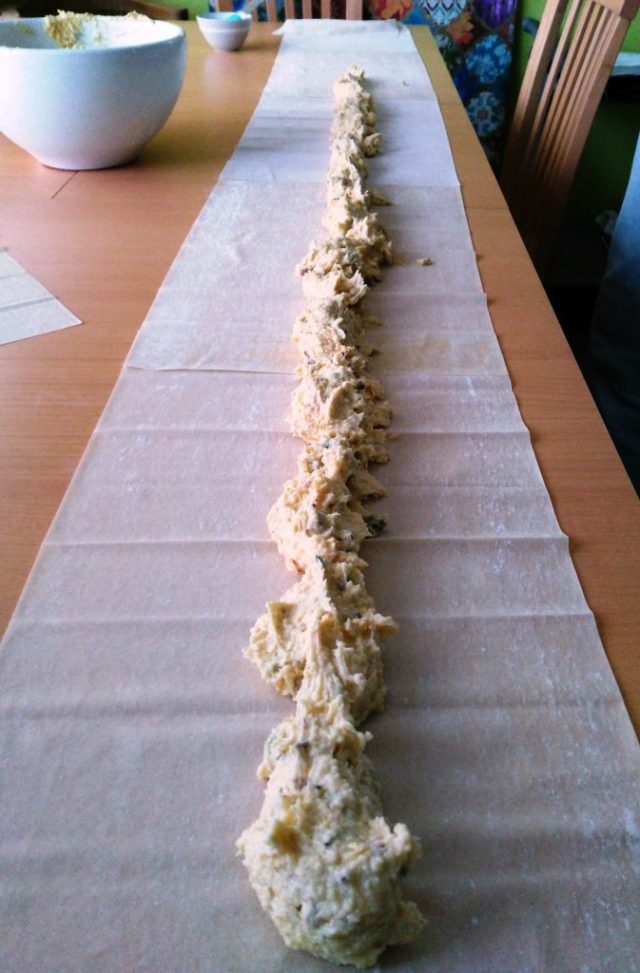 It was a little labour-intensive and there was a panic when the pie started leaking in the oven, but it turned out really well and was warmly received by all! The recipe is a Jamie Oliver one and can be found here.
Bourbon pecan brownies
 I made these bourbon pecan brownies quite a while ago, now, so apologies for the brief nature of this post! I decided to make these when I was idly flicking through Dan Lepard’s excellent Short and Sweet baking recipe book and remembered that my husband had recently acquired some rather nice bourbon. Lepard says you can make these without the booze, but that’s not something I can really understand!
The brownies were pretty easy to make, especially as I ignored Lepard’s instruction to sift the flour and cocoa twice and only did it once (rebel or what?), because, you know, life’s too short. The cooking time was spot on for the perfect brownie texture – slightly crisp on top and round the edges, but delectably gooey in the middle.

I have to say, you can really taste the booze in these brownies – which is nice, because I’ve fallen foul of many a recipe involving booze where you can’t really taste the alcoholic element, which is always a shame (and a waste of good booze!). There’s a good chocolate flavour, too, especially if you use the decent dark stuff with at least 70% cocoa solids.
You can find the recipe online here, but I do urge you to check out Short and Sweet if you’re in the market for a good baking book. The bread recipes I’ve tried are excellent (I’ve made his pitta recipe many times), and the sweet bakes are all fantastic with some great flavours, and not too difficult to throw together.
Moroccan-style chickpea stew with couscous
 This Moroccan-style chickpea and red lentil stew with harissa, lemon and mint couscous is something I’ve made a few times before, so I thought it was about time that I recorded the recipe in some way so that my husband can make it for me every so often.
I’m not sure how genuinely Moroccan it really is, but the combination of spices is something I’ve come across in other Moroccan recipes before, so I’ll tentatively say that it’s in the style of an authentic Moroccan chickpea stew, if I may.
It’s really easy to make, especially if you get the stew started then prepare the couscous so that it ‘cooks’ in its own steam while the stew is simmering away. Then all you have to do is prepare your cheese of choice – I used feta here but I actually usually serve the stew with halloumi – and away you go!

Moroccan-style chickpea and red lentil stew with harissa, lemon and mint couscous
Serves 2-3
- 1 tbsp sunflower/vegetable oil
- 1 onion, finely chopped
- 0.5 pepper of your colour of choice, finely chopped (you can also throw in some fresh or frozen spinach instead of/in addition to the peppers)
- 2 garlic cloves, crushed or finely chopped
- 1 fresh chilli, finely chopped
- 0.5 tsp red chilli powder
- 0.5 cinnamon stick
- 1 tsp ground coriander
- 1 tsp ground fennel
- 1 tsp ground cumin
- 0.5 tsp ground turmeric
- 200g tinned chopped or plum tomatoes
- 50-75g red lentils
- 400g tinned chickpeas
- juice of half a lemon
- chopped coriander or flat leaf parsley
- salt and pepper
- cubed feta or sliced and griddled halloumi (see tip below), to serve (optional but highly recommended!)
For the couscous:
- 175g couscous
- 1 tsp harissa paste
- finely grated zest of 1 lemon
- handful of fresh mint leaves
- salt and pepper
Method:
- Heat the oil in a saucepan. Cook the onions and peppers until soft.
- Add the garlic and fresh chilli and cook for a couple of minutes.
- Add the tomatoes and spices. Simmer for a few minutes.
- Add the red lentils, chickpeas and enough water to cover everything. Bring to the boil, then lower the heat and cover the pan with a lid. Cook for around 20 minutes, or until the red lentils are soft, stirring occasionally and adding more water if required.
- While the stew is cooking, prepare the couscous by placing it in a heatproof bowl and adding the harissa, lemon zest, mint and seasoning. You can also add a little olive oil if you like. Add enough boiling water to just about cover the couscous, then cover the bowl with a plate and leave to one side.
- Add the lemon juice, coriander or parsley and seasoning to the stew, and stir well. Take the stew off the heat.
- Fluff up the couscous with a fork and serve alongside the stew and the cheese of your choice.
Tip: to cook halloumi to perfection, simply cut it up into thick slices, heat a frying pan until very hot, then add the halloumi and fry it for 1-2 mins, or until brown underneath. Flip each slice over and cook for another 1-2 minutes until brown on the other side. That’s it! Don’t cook it in oil – this seems to take away the slightly crisp texture.
Masala chai cake
 Well, it’s been rather longer since my last post than I originally anticipated! But I have been baking, so fear not. My first bake of 2017 was this rather delicious masala chai cake.
The recipe is from The Cardamom Trail, the book by one of my all-time favourite GBBO contestants, Chetna Makan. It’s a lot simpler than the recipe I came up for my own sort-of successful tea masala cake five years (!) ago – and a lot more successful at replicating the flavours of traditional Indian chai, too.

I’m a huge fan of Chetna’s recipes – they’re usually not too complicated, but they still deliver on both the flavour and texture fronts every time. This masala chai cake recipe is no exception; the sponge is beautifully soft and light, while the gorgeous combination of cardamom, cloves, cinnamon and ginger really comes through.
I chose not to make the frosting because, like many other people, I’ve been trying to eat a little less fat and sugar in the aftermath of the excesses of Christmas. I think the cake is beautiful without the frosting, but I can also see how it would add a bit more oomph if you were making the cake for a less diet-conscious crowd. Without the frosting, the cake comes in at around 150 calories per piece if you cut it into 20 pieces, which I think is very reasonable for such a delicious cake!

The recipe isn’t online, but I would strongly recommend that anyone who’s a fan of using spices in baking buy The Cardamom Trail – it’s a fantastic book and I can’t wait to make something else from it!
Golden syrup loaf cake
 It’s been quiet round here, hasn’t it?! I haven’t really baked much recently apart from a couple of batches of mince pies and this rather lovely golden syrup loaf cake. But we went to Lisbon at the start of the month, so I’ll probably be making Portuguese custard tarts again some time soon!
 Anyway. I saw the recipe for this golden syrup cake on Twitter, when Ruby Tandoh (whose recipe it is) tweeted that she’d made it recently and that it was amazing. I decided to make it on the spot – golden syrup has such a gorgeous flavour, but it’s usually combined with other things like spices and black treacle, so making a cake where it’s the star of the show really appealed to me.
The cake was very easy to make and even baked in the appropriate amount of time (shock, horror)! We immediately had it warm with ice cream as per the picture below, but we found it was just as delicious cold on its own. It really didn’t last that long!
 It’s such a simple bake, but all the more tasty for it. I’d really recommend the recipe if you want something easy yet comforting in the colder months, and fancy a change from all the spices and booze of the festive period.
I’m not sure if I’ll be posting again this year, so I’ll take the opportunity to wish you all a very merry Christmas and a happy new year! I’m looking forward to spending the holiday with my husband (!) (yes, it’s still a novelty), reading a lot, baking a bit, and generally relaxing. I hope it’s a good one for you too.
Shakshuka (Middle Eastern baked eggs)

I distinctly remember hoping for a normal month in November in my last post. HA! I’ve been laid low with a particularly nasty cold for the last few days, which has also coincided with the depressing news from America on Tuesday. I also haven’t done any baking yet, so I thought I’d share my recipe for Middle Eastern baked eggs, shakshuka, instead.
If you’re on Instagram, you’ve probably seen hundreds of photos of shakshuka breakfasts/brunches so far. It is a pretty photogenic dish, to be fair! However, it’s also really tasty thanks to the spicing, and is very easy to make.
The only slight downside is that it takes a little longer to make than your average scrambled eggs on toast, but it’s so worth it!
My recipe makes a rather spicy shakshuka, so feel free to dial down the chilli if you like. Also, despite the title of this post, I don’t bake the dish – I just use the hob and grill. But you can cook shakshuka pretty much any way you please (see my suggestions below).
I’ve also listed some ways you can tweak this recipe to make Indian and Mexican versions of shakshuka.
Shakshuka (Middle Eastern baked eggs) recipe

Serves 2, easily halved or doubled
- 1 tbsp sunflower or vegetable oil
- 0.5 onion, finely chopped
- 0.5 pepper of any colour, chopped
- 2 garlic cloves, finely chopped or crushed
- 1 small green chilli, finely chopped
- 0.5 tsp chilli flakes
- 400g tinned chopped tomatoes
- 1 tsp ground cumin
- 0.5 tsp paprika (or smoked paprika if you like)
- 1-2 tbsp parsley, chopped
- salt and black pepper, to taste
- 4-5 eggs
- 50-100g feta, crumbled, to serve (or plain yogurt works well, too)
- toasted pittas or other bread of your choice, to serve
Method:
- Heat the oil in a large frying pan.
- Cook the onion and pepper until softened.
- Add the garlic, green chilli and chilli flakes, and cook for 1-2 minutes.
- Add the tomatoes, seasoning, cumin, paprika and most of the parsley, saving some for the garnish. Simmer for 10 minutes until slightly thickened (the sauce will cook further after adding the eggs, so don’t let it get too thick!).
- Make indentations in the sauce for the eggs. Crack them into each little pocket, trying to keep the yolks whole!
- Cook for 5-10 minutes, uncovered, until the whites start to firm from beneath. Finish off under the grill for a couple of minutes to ensure the whites are set on top, while trying not to overcook the yolks. Alternatively, you can cover the pan after adding the eggs, but they cook quicker this way, so keep checking on them! If you have an oven-proof pan, you can also cover and bake the dish in the oven.
- Serve the shakshuka with your bread of choice and top with the feta or yogurt and the remaining parsley. A nice finishing touch is to sprinkle a little more ground cumin on the eggs, if you like.
Variation: Indian baked eggs
Add a teaspoon of grated ginger with the garlic and green chilli in step 3, and add turmeric with the ground spices in step 4 (you could also add 200g of cooked chickpeas here). Swap the parsley for fresh chopped coriander and serve with yogurt rather than feta.
You could stir some cucumber, coriander, ground cumin, red chilli powder and salt into the yogurt to make a quick raita. You could also swap the pittas for mini naans.
Variation: Mexican baked eggs
You could add 200g of cooked black beans or red kidney beans with the tomatoes in step 4. Add a teaspoon of cocoa powder or a couple of squares of dark chocolate and half a teaspoon of ground coriander at this stage too.
Swap the parsley for coriander and the feta for soured cream (and/or guacamole if you like). Garnish with sliced jalapenos. You could swap the pittas for tortillas or just some plain crusty bread.
Fig, pear and ginger flapjacks + other bakes + an odd October
I can’t believe my last post was at the start of the month. A lot has happened since then! See below or skip straight to the bottom for my fig, pear and ginger flapjacks recipe.
Also, happy Diwali to everyone who celebrates!
Literary stuff
I had a great time going to three events at the Manchester Literature Festival. I’ve never been before, but there were quite a few interesting events on this year.
I went to events for The Good Immigrant (a collection of essays about what it’s like to be a second-generation immigrant in Britain); an anthology of short stories inspired by Jane Eyre called Reader, I Married Him and edited by Tracy Chevalier; and an examination of writing about the Lancashire coastline, featuring Andrew Michael Hurley (The Loney) and Jenn Ashworth (Fell). They were all really inspiring and gave me a lot to think about as someone who would like to write a book one day!
I also nabbed a free, signed copy of Jenni Murray’s A History Of Britain In 21 Women as part of a festival giveaway, which I’m rather chuffed about!
//platform.instagram.com/en_US/embeds.js
Outside of the festival, I also went to see the wonderful Becky Chambers talk about her two books – The Long Way To A Small Angry Planet (READ IT NOW IT’S SO GOOD) and the newly released A Closed And Common Orbit (I’m waiting for the paperback to come out before I read it, but also READ IT NOW). She’s a really funny, intelligent woman, and it was a pleasure to hear her talk about video games, science and what it’s like to write a novel.
Goodbye, Bake Off
I did, of course, watch GBBO to the end, and I’m not ashamed to admit that I cried a little at the end of the final (it’ll never be the same without Mary, Mel and Sue).
I was originally rooting for Benjamina to win (that pina colada roulade… oof!), but I’ve also loved Candice throughout, especially since That Pub, so I threw my support behind her when Benjamina left.

Credit: Radio Times
I’m thrilled that she won in the face of a stupid amount of abuse on social media over her looks, as well as the fact that *gasp* she obviously wanted to do well in the competition – rather than being all British about it and pretending that it didn’t matter if she won or not. OF COURSE it matters when you take months out of your life to practice making ever more complicated baked goods in an effort to please Paul and Mary. Let’s not pretend that it doesn’t.
I’m rather gutted that there’s no GBBO at all next year, but I’m hoping that the BBC will film Candice and Jane’s baking road trip and screen that instead next summer!
As an aside, the final technical challenge was brilliant and exactly what a technical challenge should be (none of this ‘make something you’ve never heard of’ malarkey).
The horrible bit
The biggest low this month was being mugged on my way home from the Becky Chambers event earlier in the week. I wasn’t hurt, but was rather shaken up by having my bag snatched and being pushed over by two blokes bigger than me who could just jump out of and into a car and speed off.
It’s made me quite anxious about leaving the house and getting home from work, especially as the nights are drawing in, but I’m hoping that I’ll get over it soon. I can’t very well stay indoors for the rest of my life!
The thing I’m most angry about is that they took things that wouldn’t have had any value for them (although they did manage to squeeze £45 out of my bank card), but meant a lot to me. I also resent going through the long and expensive rigmarole of having the locks changed, replacing my phone and other things that were in my bag, notifying the relevant people, etc. All so some low-lifes can no doubt buy some cheap booze and fags before doing it again to another unsuspecting soul.
Baking!
I have also been baking this month, so don’t worry! Unfortunately, all of the photos were on my stolen phone, so I’ve only got some snaps from Instagram to share.
Mary Berry’s lemon and poppy seed traybake
//platform.instagram.com/en_US/embeds.js
This was a really easy cake to make. I settled on this after my husband requested something lemony for my next bake.The sponge was wonderfully light and soft, with plenty of flavour. I deviated a little from Mary’s recipe and put the zest of two lemons instead of just one into the mix – it really made a difference to the flavour, I think.
The recipe is on Mary Berry’s website.
Banana, raisin and rum drizzle loaf cake
//platform.instagram.com/en_US/embeds.js
This is pretty the same as the banana, rum and raisin loaf I’ve made before, except that I made a rum drizzle (50g icing sugar mixed with 2-3 tbsp of dark rum) to pour over the top of the warm cake. This seemed to make the cake exceptionally boozy, which I’m sure Mary Berry would approve of!
Fig, pear and ginger flapjacks
//platform.instagram.com/en_US/embeds.js
Last week I really wanted to bake something, but couldn’t be bothered going to buy particular ingredients, so I made do with what I had in – dried figs, a pear from my mother-in-law’s garden and my trusty store cupboard. I pretty much just jazzed up a basic flapjack recipe, with good results!
The flapjacks were wonderfully autumnal, if not a little soft due to the fruit – but still very nice if you don’t mind bits of flapjack falling everywhere! The recipe is below.
Makes 16 flapjacks
- 1 pear, peeled and diced
- 175g unsalted butter
- 175g soft brown sugar (I used 40g golden caster sugar and 135g dark muscovado sugar)
- 4 tbsp golden syrup (I used 2 tbsp plus 2 tbsp of syrup from a jar of stem ginger)
- 1 tsp ground ginger
- 0.25 tsp ground cloves
- 325g porridge oats
- 100g dried figs, chopped
- 1 ball of stem ginger, finely chopped
Method:
- Preheat the oven to 180C/Gas 4.
- Grease and line a 20cm square baking tin with baking parchment.
- Toss the diced pear in a little lemon juice and sugar, and set aside.
- In a saucepan, melt together the butter, sugar, syrup, ground ginger and cloves, stirring frequently.
- Remove the pan from the heat and stir in the oats, figs, drained pear pieces and stem ginger.
- Press the mixture into the tin and bake for 40 minutes, or until golden. It may still be soft in the middle at this point, but it should firm up as it cools.
- Cool completely in the tin, then turn out and slice into 16 squares.
Here’s to a more normal November!
Fig, orange and star anise tealoaf
 After some weird is-it-or-isn’t-it to-ing and fro-ing with the weather, it’s definitely autumn now – which means it’s time to bake with lots of spices and dried fruit! I decided to make this fig, orange and star anise tealoaf from Ruby Tandoh’s Crumb recipe book a few days ago. It’s her favourite recipe in the book – and I can certainly see why.
This is very much a tealoaf as opposed to a cake – there’s no butter in the recipe, only milk, but the lovely dried figs do much to add some moisture to the loaf. The other magic ingredients are orange zest and star anise. I don’t think I’ve ever baked with star anise before – I only have it in the house because it’s goes well in certain Indian curries – but it really is the star of the show with its warming aniseed flavour.

The tealoaf was very straightforward to make, and even baked in the time specified in the recipe (praise be!). It rose a lot more than I was expecting it to, mainly because I have a history of making loaf-shaped things that refuse to rise. All in all, this was a bit of a miracle already, and I hadn’t even tasted it yet by that point.
I made this after work on Wednesday night, so I pulled it out of the oven *just* in time for GBBO. We had slices of the tealoaf warm with lashings of butter on top, which is just the perfect way to have it! There’s still some left, so I’ve been toasting and buttering slices of it as it gets a little staler.

The flavours are amazing – I prefer dried figs to fresh, so I loved them anyway, but the slight tang of orange zest and that beautiful star anise really help this tealoaf to shine. I would thoroughly recommend this recipe if you fancy baking something autumnal in the coming months.

As I said, the recipe is in Ruby’s excellent cookbook, but you can also find it online here.
